Guide: The following set of instructions will guide you through the process of enabling Bambi mode and Global window open/close on your 2017 Ford Escape. You will need internet access while connected to your car to perform these steps.
Disclaimer: I am not responsible if something goes wrong.
You will need the following:
-A Windows laptop
-FORScan Version 2.3.13 or newer
-FORScan Forum account (to get extended license) http://forscan.org/forum/ucp.php?mode=register
-Extended license for FORScan
-An OBD II adapter which is compatible with Forscan. VXDIAG or ELS27 cable is recommended. Cheap bluetooth ELM327 adapters may be rejected by FORScan
-Internet access on your laptop while connected to the vehicle
This tutorial assumes that you have already installed FORScan, activated it with the Extended License, connect the able to the computer and can successfully connect FORScan to the vehicle through the adapter.
NOTE: Some of the images below have a white background and others are gray. They were taken from two different versions of FORScan. The steps remain the same but your background should be all one color.
1. Open FORScan and connect to your vehicle (should do that automatically)
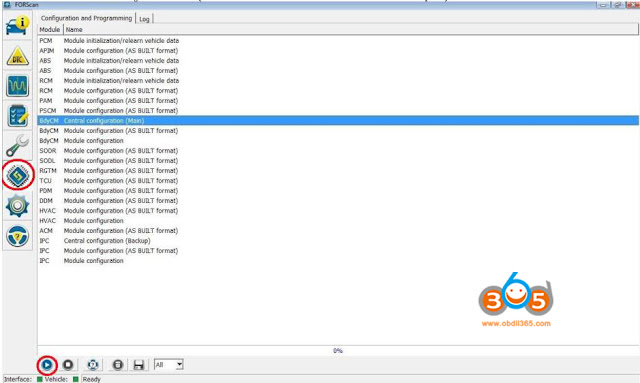
2. Once connected,
Click on the Computer Chip icon on the left side of FORScan (circled in red in pic)
Select BdyCM Central Configuration (Main) (highlighted in blue in pic)
Press the Play button (circled in red at the bottom of the pic)
 3. You will receive the following (this is where you need internet access)--click Yes
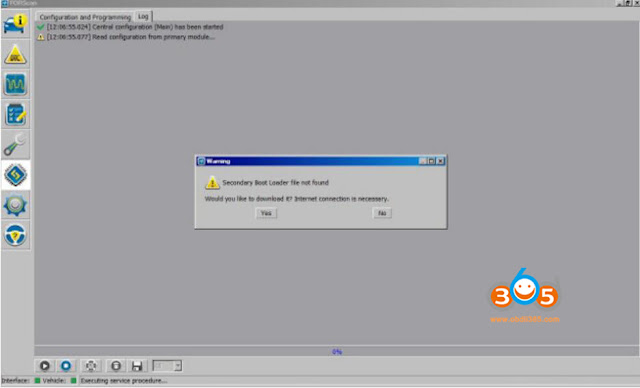 Note: if you do not have internet access while at your vehicle, leave this window open, move to where you have internet access then press Yes. Go back to your vehicle and reconnect to it
(close FORScan and Open it again if you can't get it reconnected)
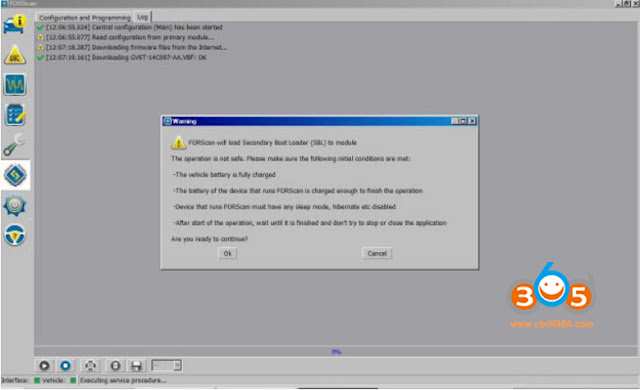
4. Once it has completed, you will see the following, click OK
Note: once you click OK, you MUST perform step 11 even if you do nothing else
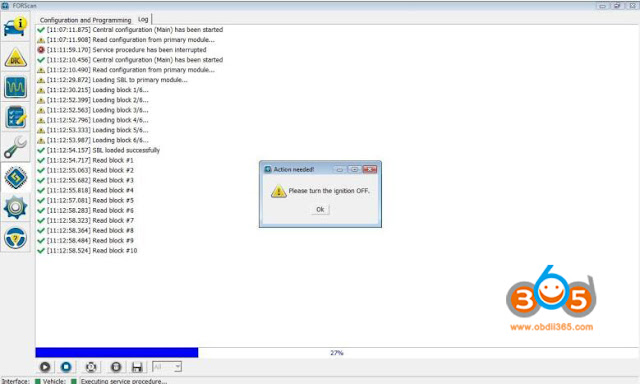
 5. Your vehicle will make all kinds of beeps, the heater fan may cycle on and off and you will see numerous error messages on the info center. Don't panic. You will then receive a message to turn the ignition off. You can if you want, but it isn't necessary. Either way, press OK
 6. That brings you to:
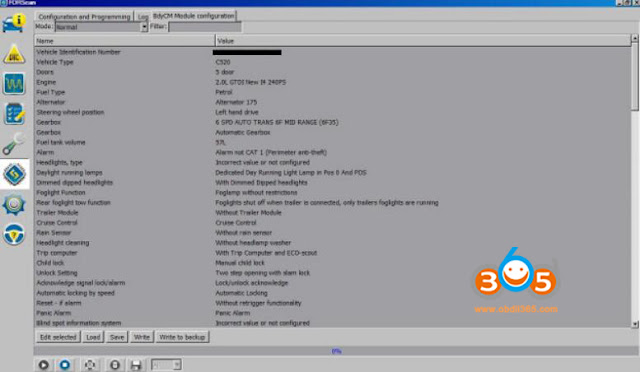 7. Next, save a copy of the current settings. That way if you ever want to go back to factory defaults or if there is a problem, you can restore to factory defaults.
Click the Save button at the bottom of the screen and you will see:
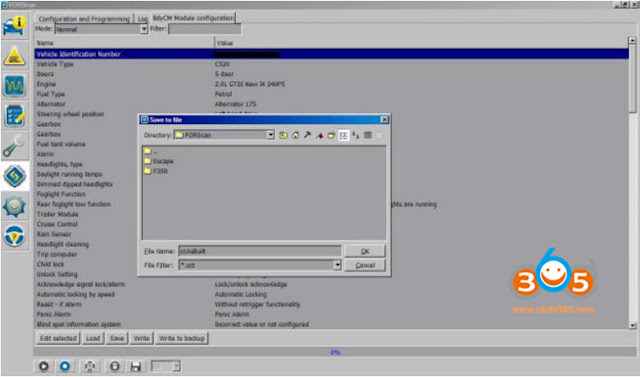 Enter a File Name of your choice. I recommend you name it something very descriptive such as ccAsBuilt or ccFactory
Press OK
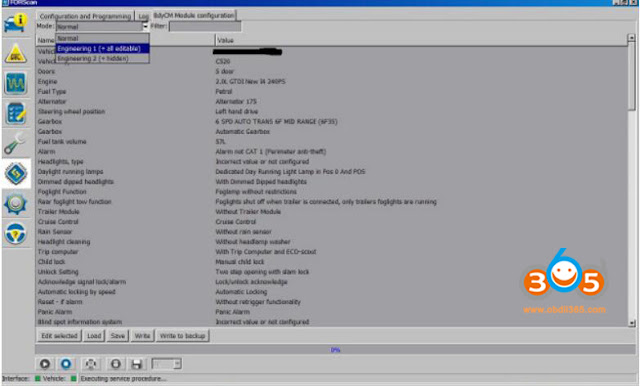
8. Enable Engineering 1 mode to allow changes
At the top of the screen, select the drop-down where it says Normal and select Engineering 1
 9. Time to make changes :-D
I strongly encourage you NOT to play with any of the settings not discussed in this tutorial.
These are for the European Kuga and will not function correctly with the Escape.
Auto Start/Stop and disabling the DRLs are known not to work and will throw all kinds of codes and cause other stuff to fail (ABS, traction control, etc).
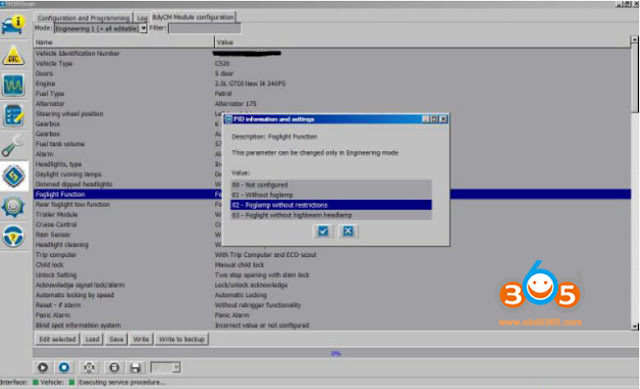
For Bambi Mode (that is Fog lights will remain on when High Beams are ON)
Double click on Foglight Function
In the pop-up, select 02-Foglamp without restrictions
Press the Check mark
 If you do not want Global Windows, proceed to step 10.
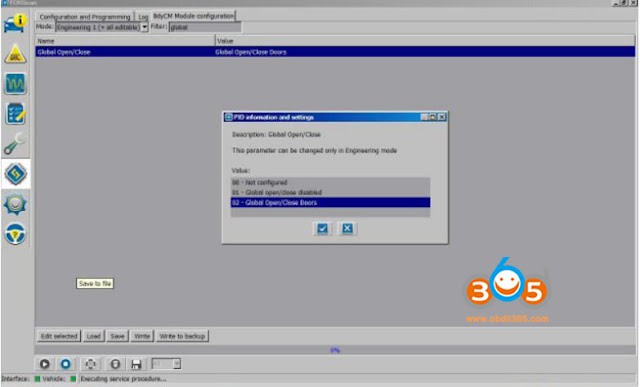
For Global Windows (this allows the windows to be opened and closed from the key fob), type 'global' without the tick marks in the Filter box at the top of the screen (beside the Engineering 1 box)
 Double Click Global Open/Close
Select 02-Global Open/Close Doors
Press the Check mark
 (To use this feature once it is programmed, press and hold the unlock button on the key fob to open all the windows or press and hold the lock button on the key fob to close them)
10. Press Write at the bottom of the screen (do NOT press 'Write to backup'. This writes to a different module and while it should not cause problems, don't temp fate)
You will get a pop-up with the changes that are being made. You should see something to the effect of Foglights restricted to Foglights without restrictions and Global Open/Close off to Global Open/Close Doors. Do NOT continue if the proposed changes do not make sense.
If all looks good, then proceed with writing the file, follow the prompts (you will see the same screen from step 4, press OK).
Once the write process is complete, press the Stop (Square) button at the bottom of the screen.
11. Now you must clear the DTCs that were created. There will be a bunch. You MUST do this
even if you did not write any data. Simply entering Central Configuration caused the DTC's.
(all the beeps and error messages you saw earlier)
At the Main FORScan menu on the left side of the screen, select the Yellow triangle DTC button
At the bottom of the screen, select the clear DTC button
Follow the prompts
After cycling the ignition, clear the DTCs a second time, they may not all clear the first go around.
After cycling the ignition after the second clearing, select read DTCs. If there are no codes, all is good. If there are codes, clear them again. If the DTCs will not clear, then the computer does not like a setting you made. Best bet here is to return to factory defaults using the file you saved earlier and start over. Instructions below if needed.
There, Phew, all done.
Returning to factory defaults:
Follow steps 1-5 (you should not have to do step 3 again)
Press the Load button
Select the file you saved in step 7
Press OK
Follow steps 9 and 10 (Write and clear DTCs).
Disclaimer: I am not responsible if something goes wrong.
You will need the following:
-A Windows laptop
-FORScan Version 2.3.13 or newer
-FORScan Forum account (to get extended license) http://forscan.org/forum/ucp.php?mode=register
-Extended license for FORScan
-An OBD II adapter which is compatible with Forscan. VXDIAG or ELS27 cable is recommended. Cheap bluetooth ELM327 adapters may be rejected by FORScan
-Internet access on your laptop while connected to the vehicle
At about $89 vxdiag vcx nano works flawlessly with Forscan and does both HS-CAN and MS-CAN automatically. Just select j2534 for the connection type. I should note that I do not use the VXDIAG VCX with Ford IDS or any other program besides Forscan.
If you don't mind spring for the extra $ I recommend the vxdiag. J2534 connection is the superior connection tech for Forscan. It's faster, comprehensive functioning and as far as my experience just works.
If you don't mind spring for the extra $ I recommend the vxdiag. J2534 connection is the superior connection tech for Forscan. It's faster, comprehensive functioning and as far as my experience just works.
This tutorial assumes that you have already installed FORScan, activated it with the Extended License, connect the able to the computer and can successfully connect FORScan to the vehicle through the adapter.
NOTE: Some of the images below have a white background and others are gray. They were taken from two different versions of FORScan. The steps remain the same but your background should be all one color.
1. Open FORScan and connect to your vehicle (should do that automatically)
2. Once connected,
Click on the Computer Chip icon on the left side of FORScan (circled in red in pic)
Select BdyCM Central Configuration (Main) (highlighted in blue in pic)
Press the Play button (circled in red at the bottom of the pic)


(close FORScan and Open it again if you can't get it reconnected)
4. Once it has completed, you will see the following, click OK
Note: once you click OK, you MUST perform step 11 even if you do nothing else


Click the Save button at the bottom of the screen and you will see:

Press OK
8. Enable Engineering 1 mode to allow changes
At the top of the screen, select the drop-down where it says Normal and select Engineering 1

I strongly encourage you NOT to play with any of the settings not discussed in this tutorial.
These are for the European Kuga and will not function correctly with the Escape.
Auto Start/Stop and disabling the DRLs are known not to work and will throw all kinds of codes and cause other stuff to fail (ABS, traction control, etc).
For Bambi Mode (that is Fog lights will remain on when High Beams are ON)
Double click on Foglight Function
In the pop-up, select 02-Foglamp without restrictions
Press the Check mark

For Global Windows (this allows the windows to be opened and closed from the key fob), type 'global' without the tick marks in the Filter box at the top of the screen (beside the Engineering 1 box)

Select 02-Global Open/Close Doors
Press the Check mark

10. Press Write at the bottom of the screen (do NOT press 'Write to backup'. This writes to a different module and while it should not cause problems, don't temp fate)
You will get a pop-up with the changes that are being made. You should see something to the effect of Foglights restricted to Foglights without restrictions and Global Open/Close off to Global Open/Close Doors. Do NOT continue if the proposed changes do not make sense.
If all looks good, then proceed with writing the file, follow the prompts (you will see the same screen from step 4, press OK).
Once the write process is complete, press the Stop (Square) button at the bottom of the screen.
11. Now you must clear the DTCs that were created. There will be a bunch. You MUST do this
even if you did not write any data. Simply entering Central Configuration caused the DTC's.
(all the beeps and error messages you saw earlier)
At the Main FORScan menu on the left side of the screen, select the Yellow triangle DTC button
At the bottom of the screen, select the clear DTC button
Follow the prompts
After cycling the ignition, clear the DTCs a second time, they may not all clear the first go around.
After cycling the ignition after the second clearing, select read DTCs. If there are no codes, all is good. If there are codes, clear them again. If the DTCs will not clear, then the computer does not like a setting you made. Best bet here is to return to factory defaults using the file you saved earlier and start over. Instructions below if needed.
There, Phew, all done.
Returning to factory defaults:
Follow steps 1-5 (you should not have to do step 3 again)
Press the Load button
Select the file you saved in step 7
Press OK
Follow steps 9 and 10 (Write and clear DTCs).
 RSS Feed
