FVDI J2534 is very simple to use and easy to install. You only need to do two steps to Installs software. First,install FVDI J2534 start software, then install the original brand vehicle software,For example, Ford, Mazda, Honda, Toyota. However,
These software cannot be installed in the same computer. If you want to use these software via FVDI J2534 diagnostic interface, please install different software on different computers.
Supported J2534 software
Ford IDS V110
Mazda IDS V108
Toyota TIS V13.00
Honda HDS V3.102
Land Rover/Jaguar SDD2 V153
Nissan CONSULT III plus R2R V80.11
Supported ELM327 software
ELMconfig
Forscan
FOCCCUS
FF2
How to get FVDI J2534 software?
You can get the FVDI J2534 software in two ways:
1) Default software in CD comes with the package
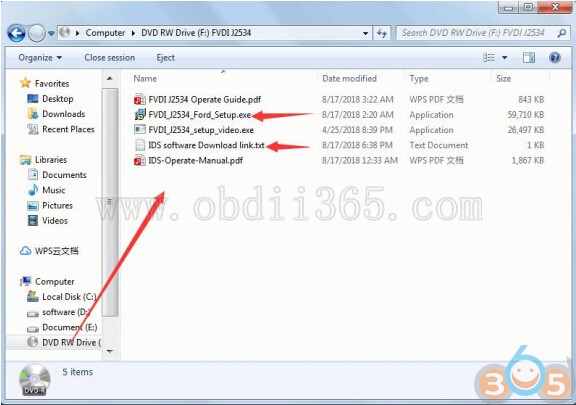
Get FVDI J2534 equipment software from compact disc(CD)
Put the CD in the computer CD drive
Wait a while before opening the CD in the resource manager,you will see the equipment related software and resources.
2) Download J2534 software from official website: http://flyobd.com/shop/download-center
Note:The software download link is always up to date.
For example: download Ford/Mazda IDS
Access to download center
Please register and log in
Download FVDI-J2534-FM (FM,Short for Ford and Mazda)
Download IDS Ford or IDS Mazda
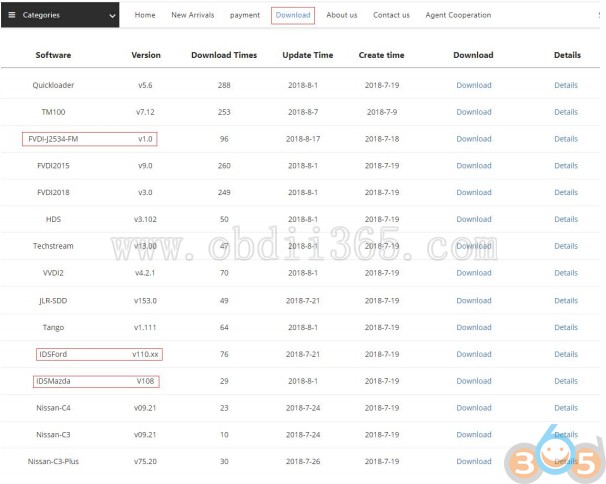
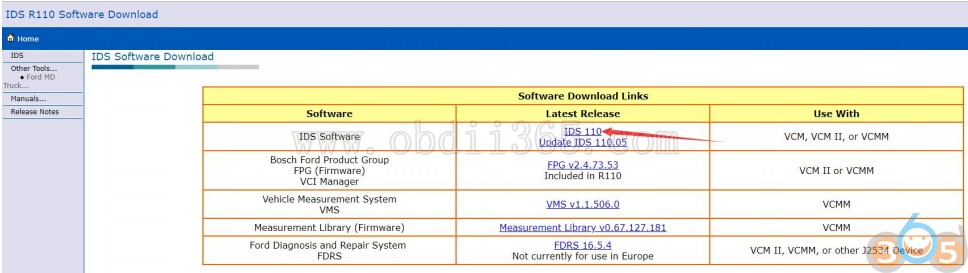
Download the latest release IDS software and save it to local.
How to install IDS and FVDI J2534 software?
Install the latest release IDS software
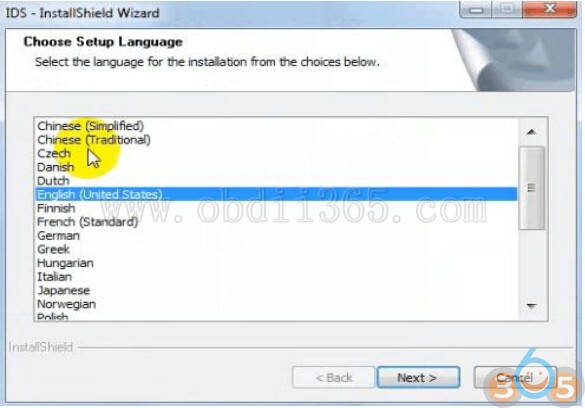
Double-click the “IDS-110.01_Full.exe” to start installation
Select language,and click “next” button
Wait a minute,and the following windows will pop out,click “Yes”,then click “next”
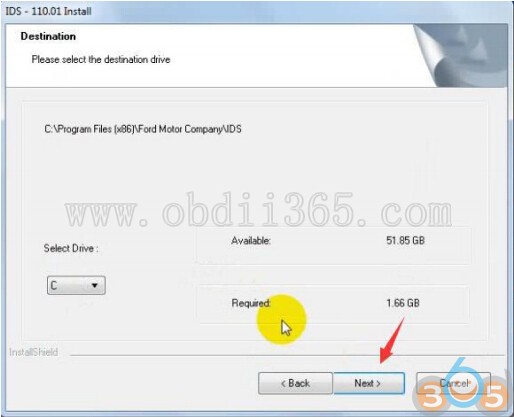
Select “i accept the terms of the license agreement”, and then click “next”, and then click “next”, and then click “install”. The installation process will take some time,please wait patiently.
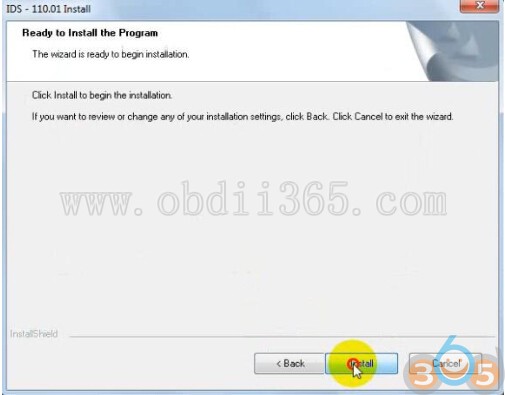
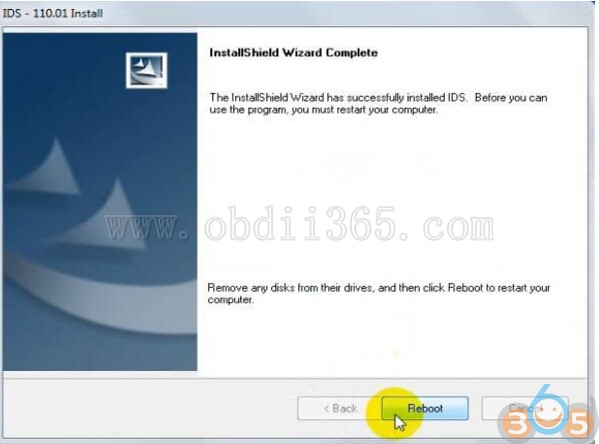
Reboot your computer after installation
Install the FVDI J2534 software
Open compact Disc and find FVDI-J2534 software and double-click the
“FVDI_J2534_Ford_Setup.exe” software
Select Setup Langeuage and Click “Ok”
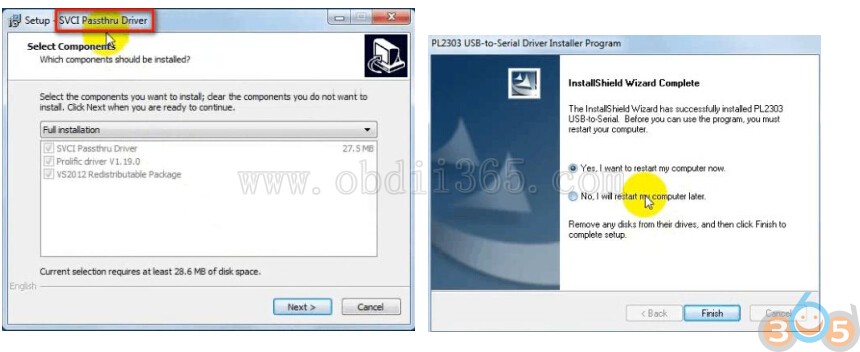
It will install FVCI Based software list, Click “next” directly, and then Click “next” all the time untill it jump a window “Select Setup Language”, which is selected the device driver's installation language.
Install the device driver,and click “Next” all the time untill install Shield wizard complete, and then click “finish”.
When you open FVDI J2534 for ford software after installation, an error window will pop out. That means you have not connected FVDI J2534 equipment with your computer, as show in the below. connect your device with computer,and the FVDI J2534 software will be opened normally.
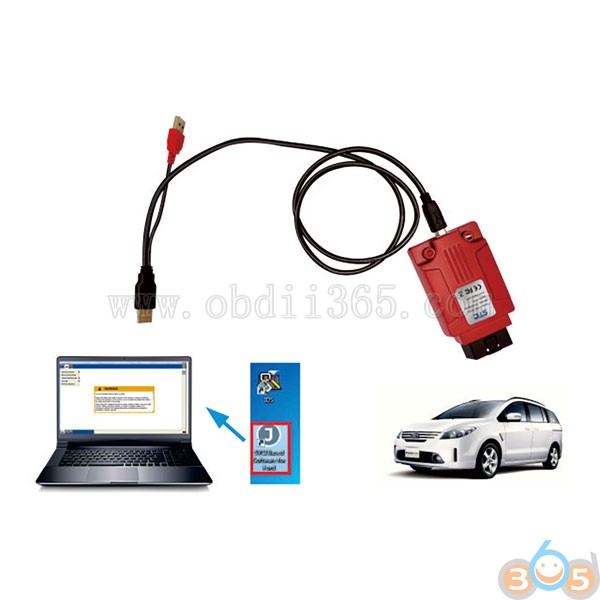
When you connect FVDI J2534 interface with the computer and open the software,
it will pop below error message, it means you do not connected vehicle ECU module and the ECU voltage can not less than 8 volts. After using the OBD interface of FVDI J2534 to connect the ECU,and the software can be opened normally and put into use.
Note: Cannot open the IDS software on the desktop directly,it is recommended to delete the IDS software shortcut on the desktop.
Test: ND900 Mini and VVDI Keytool with Ford Chip 4D83 80bit for a spare key copy
Car: Ford Fiesta 2014
Chip: 4D83 80bit
Test 1: Xhorse VVDI Key tool on Ford 83
Confirmed! VVDI keytool can copy Ford 83 chips:
First, put the original car key into the left coil of VVDI Keytool..start to read Ford 83 transponder data
Then, keep network available and press “calculate” to submit calculating data
The last, put VVDI special 4D transponder into the left coil of the Keytool… press “write” to complete cloning
Important:
Ford 4D 63 40bits: no need to copy chips online
Ford 4D 83 80bits: MUST calculate chip data online
Result: VVDI Keytool on Ford 83 – SUCCESS!
Test 2: MINI900 on Ford 83
Mini 900 can’t do it.
if you wan to copy id83, first need decode this chip. Mini 900 or nd900 cannot decode any iD83.
Result: Failed!
Conclusion: Ford Fiesta 4D83 80bit – VVDI Key Tool: Yes! ND900 Mini: NO!
Reference:
– VVDI Keytool chip list & functions:
– ND900 Mini chip list & functions:
VVDI Keytool chip list & functions:
Chips can be recognized
Chips can be edited (read and written)
Chips can be copied offline
Chips can be copied online
# Functions will be released
* Only support some
MINI 900 chip list and functions:
Function 1:
1) Read out the chip code for 11 12 13 33 T5 40 41 42 44 45 46 48 4C 4D 8C and 8E chips. With the detail format for ID 48 and 4D Chips. 2) New identify functions for Toyota “G ” chip key (year: 2010) (Chip: 4D-72). And it will show if the key is the main key or the vice key for Toyota, and later will add new identify function for the Chinese Car.
Function 2:
Identify Toyota smart key, and read out the data.
Function 3:
Copy the chips (11 12 13 33 T5 41 and 42) and parts of 44 and 45. Using “FREE ” dedicated chips can copy none battery 4C and 4D chips directly.(Remark :cn1(4C),cn2(4D) is the name of special chip)
Function 4:
Connect with Chinese PC software, it can save the read key code data unlimited.(PC Software haS not release,will be released in the future)
Function 5:
Chip programm: with the inner function of HITAGETI, it can write ID 46 Renault Crypto chips.
Function 6:
Without removing the ECU (Benz W140), it can start the chip.
Function 7:
Unlock the 48 chips except the crypto lock 48 chips.
Function 8:
Pin code calculating for Hyundai and Kia (before 07 year), by using the Last 6 Codes of VIN Number.
Function 9:
Start the key and calculating the pin code for more than 60 kinds of cars. Programm all kind of Fiat key, such as (11, 13 and 33), These 3 kinds of 48 chips anti-theft way.
Function 10:
Identify HONDA_46 CRV_46/CIVIC_46/ Mitsubishi 46 Ordinary 60 can be programmed to be 66/67/68/71/74
Function 11:
Copy CN1 (4C), CN2 (4D) chip .And size is 6mmX12mmX4mm Software is updatable, such as adding new function for copying the induction card for Electronic Gate.
Function 12:
Copy all ID46 chip: BMW 46 chip, ACURA 46 chips,Honda CRV FIT(NEW) Accord(2008) Civic 46 chips; Mazda haima 46 chips;Mitsubishi 46 chips; Buick GMC CRUZE 46 chip. New Chery tiggo A3 46 chips; Nissan TIIDA TENNA LIVINA Sylphy Nissan QASHQAI Q35 46 chip. Brilliance 46 chip. Peugeot/Citroen 307 206 -46 chips; Triumph Senna 406 (2001year);Picasso 46 chip. Suzuki swifts SX4 46 chip. Land Rover FREELANDER 46 chip. Geely dedicated 46 chip.
Function 13:
Copy 4D chip
Function 14:
Toyota G Chips Cloner
Success! You have good luck to program Volvo S60 the year 2002 using VOLVO VIDA software.
After replacement of a failed CEM (central electronics module) on a 2002 Volvo S60, the software needs to be downloaded to the vehicle. This is done through Volvo VIDA software: http://www.obdii365.com/wholesale/2014d-vida-dice-diagnostic-tool-for-volvo.html
You need to buy a subscription from Volvo to gain access to the software files that you need to download, and then reload to the new DIM.
You need to be online. When you get a subscription, you gain access to VIDA 2014D but you still need to purchase and download the specific software you are re-loading, in this case, the CEM. It is a very time consuming process, especially if this is the first time you are programming. Lots of reading in their site. Hope this helps.
Here you go. Numerous communication faults found…
…due to a failed CEM
After CEM replacement, software is downloaded to vehicle
Programming a new control module
Programming of codes in progress in central electronic module (CEM)
The keys are manually programmed to the vehicle during the download
The diagnostic trouble codes are erased in all systems
The software has been downloaded into the vehicle
Carry out a pre-delivery check before returning the car to the customer
Note: during certain download sequences, the clock in the car will stop. Check and adjust as needed.
Select OK to finish the download sequence and to close this tab
The software download is complete
Done!
Part 1: How to Register new battery to BMW E90 with Autel TS608
How to use the Autel MaxiTPMS TS608 service function to register a new battery to a BMW E90 335i 2008. This process can be done using the TS608, Any MaxiSys tool via Service, MX808, and the MD802. All the steps are the same for each tool.
Connect TS608 with vehicle via main test cable
Select Service function->BMS->BMW->Auto selection->Auto read VIN
Read vehicle information and confirm
Select Hot Function->Register battery replacement->2 Register battery replacement
The battery change is entered in the DME/DDE in the next test step.
Procedure the following state:
Engine off
Terminal 15 on
Entry cannot be cancelled. Currently registered battery capacity: 90Ah.
Select 1 Enter battery replacement: Same capacity
Confirm is the newly installed battery an original BMW component.
Press NO to continue
The battery replacement was successfully entered in the DME/DDE.
Part 2: Register a Battery to BMW E90 with Autel MaxiSys Pro MS908P Using the MS908P or MaxiSys Elite you can not only register a battery to a BMW you can change the type and reserve capacity of the battery you are installing. I will show you the process to register a new AGM battery in place of a lead acid battery in this BMW 335i E90.
Go to BMW information as well
Select Programming function
Autel MaxiSys displays detail vehicle info.
Select Retrofit/conversions
How to program Peugeot 407 year 2007 remote key including pin code reading using Lonsdor K518ISE key programmer.
Step 1: Read Pin Code
Select Peugeot->Read Pin Code->Type 2
During the function operation, the windshield wiper brushes and the headlight illuminates which is normal
To stop wiper brush, check Help and pull out the corresponding fuse.
Turn ignition switch to ON position
Lonsdor K518 read vehicle information
Reading data and verifying pin
Read pin code success
Step 2: Program key
Select Peugeot->Select from vehicle->407->Immobilizer->Program key
Turn on ignition
Lonsdor K518ISE will require to enter pin to access
Turn ignition off and then turn on within 15 seconds
Program complete.
Press YES to program next key or Cancel to quit.
Step 3: Program remote control
Step to reprogram remote control:
1.Switch ignition off and remove key 2. Insert a key and switch ignition on 3. Press any button of the remote key for 10 seconds and release within 20 seconds. 4. Switch ignition off and remove key 5. For more keys, repeat step 2-4
Program Peugeot 407 remote key success.
There are several key programmers will do Ford/Mazda, but seldom tools cover newer vehicles 2017 up. Both Auro OtoSys IM100/ IM600 Mazda software releases to latest and supports year up to 2018 key programming. Here’s the guide to program smart key for Mazda2 year 2018.
At least 2 keys are required to be learned to start engine
Connect IM100/IM600 host with vehicle via OBD socket
Select IMMO->Select or auto search Mazda->Manual Selection->Mazda2->2017 up->Smart Key->Keyless System (CAN)->Add smart keys
Turn on ignition switch
Auro IM100 detects current number of smart keys: 2
System configuration in progress. Wait for about 7 minutes until you can hear vehicle horn
Depress the brake for A/T vehicles and clutch for M/T vehicles.
Put the smart key close to the START button
3rd key programming succeed
Key learning success. Press Yes to program next key.
Do following procedure:
Turn ignition off. Depress the brake pedal, put the head of one learned key close to the START button, start the engine for 3s and then turn the ignition off.
Repeat this procedure for each learned key.
Success.
If you are interested in AURO OtoSys IM600 , please contact us for price.Thank you
Problem:
Try to read ecu from Mercedes W204 2.2 CDI 100kW. I use KSuite 2.13 and KTAG EU 7.020 via BDM.
Trying Read it via protocol (Delphi DCM3.2 MERCEDES P119) but without success.
After identifying ECU …
i get response: Hardware configuration not supported: send the LOG files to the software provider. BDM connections is the same as in the HELP in KSuite. How correctly READ and WRITE this ecu by KTAG master clone ?
Solution:
You can read this ecu with ktag clone v7.020, customers do this several times.
The problem could be you’ve missed 2 pins shows yellow instruction in ktag. You need make direct connect with 2 pins on the pcb, and they will read it. One more thing, better use genuine or high quality crd1.1 adapter to work with.
You can also make bdm adapter out of your soldering adapter which came with k-tag.
Solved…
For all with this Problem:
ECU – Ktag
3-6 2-1 4-5 6-10 8-7 10-8
And make 2 Bridge (see attachments).
k-
Delphi CRD.11 KSuite connection instruction
select protocol BDM MPC5XX / DELPHI DCM3.2 MERCEDES 119 from ktag
Ecu Delphi DCM3.2 CRD.11
Feedback: works great.
If you have budget, original ktag is the best option. 100% no issue.
JMD Handy Baby key copy machine software release to V9.0.2 on August 16th, 2018. Handy Baby newest version 9.0.2 can copy 46 chip by king chip directly , can generate some 7935 chip and decode some 40/41/45 chip.
Handy Baby 9.0.2 update content: 1. Optimize BYD 46 chip one-click write key data, increase password-free matching
JMD Assistant latest version is 9.0.0
Free download JMD client software on official website: http://www.handy-baby.net/download/59.html?lang=en_US http://www.obdii365.com/info/jmd-handy-baby-key-copy-software-update-to-v902-57591.html
Vehicle Information: VOLVO XC60 year 2011
Example: EPB Reset after replacing rear brake block Step 1: Turn on the ignition switch, select P gear, press the EPB switch to release the handbrake. Select P gear and release the handbrake Step 2: Connect EUCLEIA Tabscan S7W/Tabscan S8 diagnostic scanner with vehicle
Select Service function
Step 3: Choose “EPB Reset” Step 4: Choose “VOLVO” Step 5: Choose“XC60” Step 6: Choose “Replace the rear brake pads” Step 7: Turn ignition on and engine off, click OK Step 8: at this point, the brake pump will be retracted, and then the ring of rear wheel brake pump will be heard for a few seconds, waiting for the page to jump before replacing the new brake pad to the car. Step 9. After the replacement is completed, click "confirm" and the brake pump will be released, and the ring of motor will be heard for a few seconds, waiting for the page to jump and then click "confirm". Step 10: Click “OK” button and exit the system. Turn off and then turn on the ignition switch and press EPB button. Completed. Note: For EPB Reset usually need release the handbrake. |
AuthorCategories |