Try this: BMW ICOM ISTA-D change language
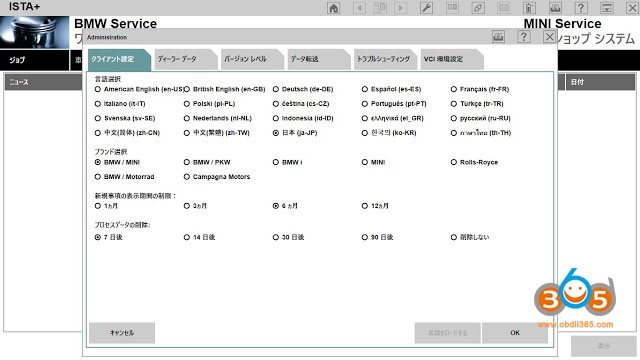
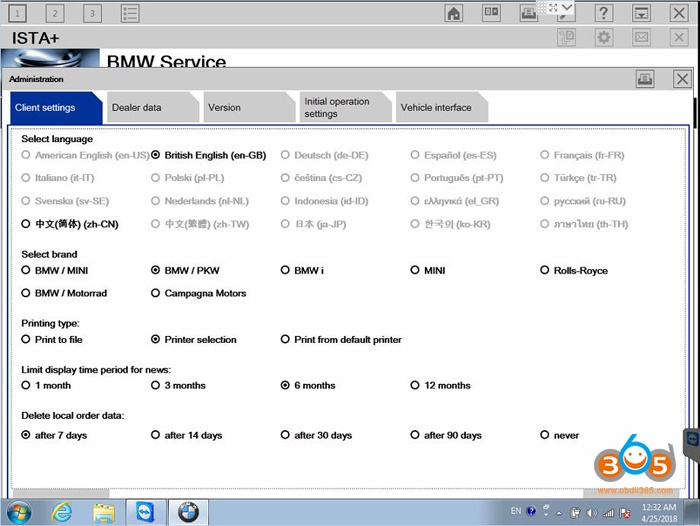
ISTA-D language options:
British English, German, Spanish, French, Italian, Polish, Portuguese, Turkish, Czech, Swedish, Dutch, Indian, Greek, Russian, Simplified Chinese, Traditional Chinese, Japanese, Korean and Thai
Steps to display ISTA-D language of your country…
Method 1:
Step 1: go to C:\Program Files (x86)\Rheingold\SQLiteDBs
Step 2: remove the SQLiteDBs files in the folder to start the ISTA-D (Rheingold).
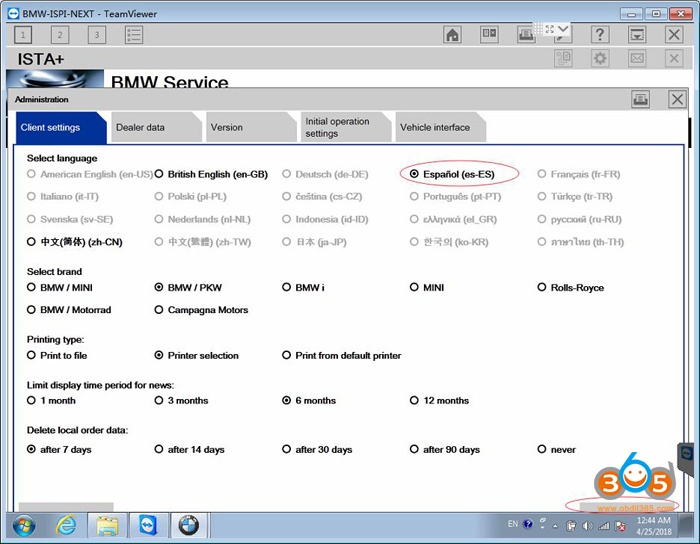
Step 3: select the language of your country by clicking on the spanner mark .
Step 4: close the ISTA-D (Rheingold)
Step 5: Is the end of the deleted SQLiteDBs file back to the original
Method 2:
Step 1: Run ISTA-D software
Step 2: Then you will find that there are only English and Chinese language activated
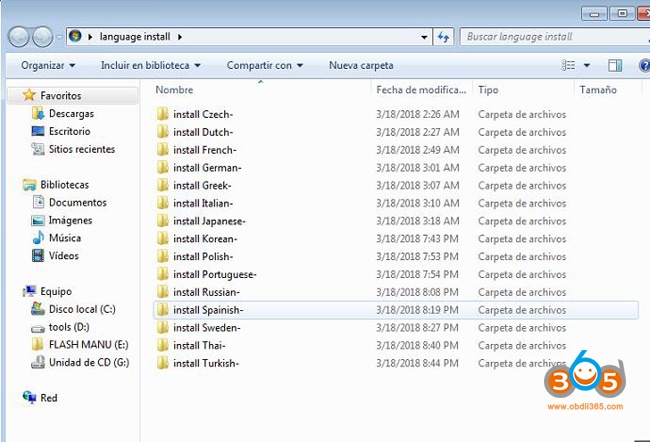
Step 3: Get the language installation fold from the desktop, check the photo below:
Step 4: Run”language install” application and choose any language file
e.g. choose the Spanish language file to install
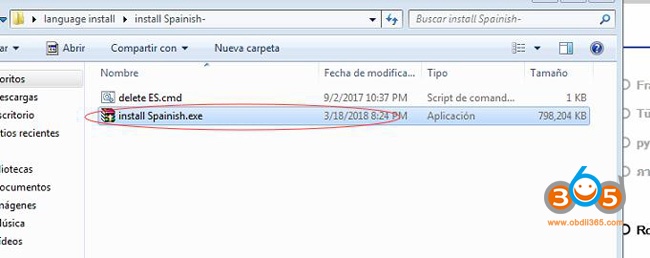
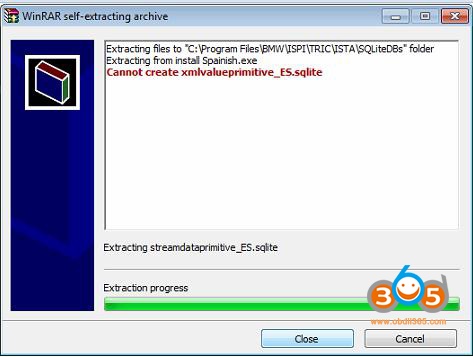
The Spanish language is installed
Then you have Spanish ISTA activated
Step 5: Save
Then you have the Spanish ISTA software for use
Done! ISTA-D language is changed!
Note: if you have ISTA from use and cannot change the ISTA-D language yourself, pls contact the support @ http://www.obdii365.com/
AT-200 ecu programmer & ISN code reader supports over 1280 ECUs, including BMW MSV90,MSVD85, MSVD85.1,MSVD85.2, MSVD87, MSVD87.2, N13, N55, N20, B38,B48 etc.
Here’s the guide to read and write B38 ISN using AT-200 on bench.
1) Read ISN
2) Modify ISN
3) Module cloning
In AT-200 software, select BMW model and Engine ECU type
i.e Select BMW 1 series 116i B38815A 109 Bosch MEVD17.2.K TC1793
Choose Bench mode
Check wiring diagram
Connect ECU with AT200 via tuning adapter follow the wiring (adapter comes with the at200 programmer)
Identify ECU type
Press Read ISN
Read ISN successfully
Select Write ISN
Manually enter new ISN value and press OK to continue
Write ISN successfully
Module cloning (clone ECU)
Press Read Dflash
Save Dflash data
Select Read Pflash
Reading pflash in process
Save Pflash.
Check AT200 ECU list
How-to use the Autel G Box for Mercedes fast password calculation and write key to a Benz W207 with MaxiIM IM608 when all keys lost.
Step 1: Calculate password Step 2: Generate Key File Step 3: Write Key Step 1: Calculate password In IM608 select IMMO->Mercedes->Expert Mode->Password calculation->All keys lost (Fast) Check G-Box all keys lost instructions Select On bench->W207 Follow notes to connect G-box with IM608 and EIS Remove the EIS from the vehicle. Correctly connect the EIS to the G Box Connect G box with XP400 OBD connector Connect G box with power adapter Press OK to read password Follow 5 steps to calculate pass: 1) Connect the device, OBD cable and OBD connector on the wiring harness in sequence 2) Connect the IR key simulator (APB102) to the programmer 3) Insert the IR key simulator into EIS (if already inserted, remove and insert it again), start collecting data 4) Collecting data, calculating password Ther process takes 10-50 mins. Ensure that the device and vehicle battery are stable and sufficient during the process. 5) Password calculation completed Step 2: Generate Key File Select Generate Key File function Check and confirm vehicle information Autel IM608 automatically enter 16-digit key password to access Select an unused key position, i,e Key number 6 Choose V51 key Succeeded to generate key file Step 3: Write Key Insert a third party blank key into the infrared key hole on the xp400 programmer Select Write Key->IR->Write BE key file Select key6 file Communicating with the key Write key success Test the new key. Done. www.obdii365.com
The MINI VCI cable for Honda (also called mangoose for Honda) gives very good results for older Honda models, compared to expensive universal testers that usually do not produce conclusive results. I failed to install software on Windows 7, but make it work on XP Mode on Windows 7 machines using VMware. Check tutorial below :
Connect mangoose Honda vci cable with laptop
Check MVCI firmware version. It is V1.4.1
StartHDS program shows software version 2.018.013
Try to run Honda Diagnostic System software on the desktop, Win7 reports an error “The program cannot start because NPPTools.dll is missing from your computer.”
Power on virtual machine
Open software CD Open HDS folder Run Setup.exe Install Wizard to HDS PC Ver.2.018 Accept license agreement Select deationation, i.e USA Select communication interface as GNA600 Press OK when system prompts interface device instruction message InstallShield Wizard complete
Open software CD again
Open MVCI Driver 1.4.3 for HONDA folder Install MVCI Driver for HONDA Finish installing MVCI driver Press Yes to confirm installer information
Software is ready to use
Run StartHDS to check software version
Exit StarHDS program
Run Diagnostic System software on desktop
Start vehicle diagnosis
Done.
I have a number of interfaces:
– CarSoft – VAG COM – INPA with serial port – K+D CAN with USB (opaque colour casing) – ADS/OBD interface My current favourite is the K+D CAN USB. It works on all current models as well as everything for e46/e39 era. For older cars with the big round diagnostic connector under the bonnet you’ll need: – a proper serial port on your laptop – a lead with the serial port type connector USB to serial or PCMCIA will not work for some modules on older cars (fine for newer stuff)
The VAG-COM one you’ll need to do some slight modifications for coding & programming but will work for fault code reading unmodified.
With the USB K+ D CAN type cables there are a few installation steps, drivers & a little app that you need to make them work properly. Once you have them they are great though. However a lot of sellers don’t mention or probably don’t even know what these are. It is a bit confusing trying to get it all to work. I’ll try update over the weekend with instructions, pictures, etc. Also with these cables there are two subtle different versions, one with pin 8 enabled, one with it disabled. The one with it disabled is ideal for e90 newer than 03/07 & that era, these leads often come with a black adapter to re-enable the pin 8 (by just tying it to pin 9) so it will also be suitable for e46/e39/e63 etc. The ones with pin 8 active are just older versions of the cable. Worst cast scenario you just need to modify the cable & stuck a switch on it to toggle pin 8 on/off as needed.
The interface I want to get is a German version of the K+D CAN cable (probably the one that all the Chinese opaque ones have ripped off the design from!).
I should mention that while a CarSoft interface can be made to work with INPA it is not recommended. When I first got INPA, etc. going I was using my CarSoft interface, you have to run a CarSoft test to “initiate” the lead every time. What a PITA, stay away from this solution! Also not all serial cables will work on ADS cars like e36/e34/e38, the black serial cable below only works on OBD1 cars like pre 2001 e39.
So depending on what car you have that will determine the best choice for you. If it’s going to be all newer than e46 then definitely get a K+D CAN one to future proof yourself.
I’ll update when I can but I’m just in the middle of some crazy busy work at the moment!
OK, here are some pictures of the various cables that can be made to work. Just bear in mind folks that the install of all the software is not like buying Microsoft windows where you just throw the disc in the drive & click install.
INPA INPA is the easiest to get up & running but there are a few things you need to consider when setting it up, there are different protocols for different era of cars, for example:
– ADS is used on e38, e36 & e34, the ones with the round OBC connector under the bonnet. If you set up INPA with the OBD interface set up then you’ll have issues trying to diagnose an e36 for example
– OBD is used on e46 & later e39s along with any car of that generation & newer cars use OBD
The complications don’t stop there if you plan on using Progman, you need to be worrying about EDIN, OPS & a few other things, but I won’t go into that now!
GT-1/Progman The reason for this is the software (DIS/Progman/NCS, etc.) is designed either for use in the BMW factory or in the BMW dealers, not a general release product. Two of the most basic issues (which have been over come) are:
– GT-1/DIS is designed to run on an IBM T-30 laptop running UNIX with a very specific hardware configuration. Using VMWare gets around a lot of those issues, you’re effectively running it as a virtual UNIX machine within your Windows machine.
– GT-1/DIS, etc. is designed to run through a “diagnostic yellow head” (or could be orange too, I’m not going to pretend I know the infinite detail on this). These boxes are essentially a translator that turns (for the want of a better word) the BMW speak into regular computer speak. Some clever people have figured out how to simulate this “diaghead” by using an “emulator” set up. This emulator set up also relies on the virtual network capabilities of VMWare, the emulator can either be on the UNIX side (this is the “FISTER profile” that some of you may have read about on other forua), or it can be on the Windows side (this is the Diaghead emulator). These emulators are used in conjunction with the NetServer that is built into INPA (or more correctly that is built in to EDIABAS). Don’t worry so much about understanding this, all that you need to know is for running DIS/Progman you need to run IFHSRV32.exe in order for it to work!
OK, on to the cables, there are a couple of protocols that are used on BMWs K & D CAN (there may be L as well but not sure), most of the cables can do the K CAN. K CAN is fine if you have a car built before September 2006, after that you need to look at the list below:
Models that require D-CAN: – E60, E61 after 3/2007 – E83 after 9/2006 – E81, E87 after 3/2007 – E90, E91, E92, E93 after 3/2007 – E70 (New X5) – R56 (New Mini) – And others…
USB v Serial Port
Why would I buy a cable with a serial connector I hear you say? Well if you have an e36 (or early e39 or e38) you will need to use “ADS”. ADS only works properly with a real serial port. If you are using a USB to Serial adapter this may not work for all modules in an ADS car. Just be weary of that. So if you have an e36 you’re better off with an old laptop with a real Serial port using a serial port cable like this: Serial Port Cables 1. ADS As mentioned previously the ADS interface is a different protocol, if you don’t have an ADS interface with an e36 then what you’ll be able to read with a regular OBD cable is limited. Unfortunately the ADS interface seems to be the hardest to get & most expensive of all the interfaces. Here’s a picture of my ADS interface, Do It Auto also do a version of this interface. It works fine on the e36, e39 & e63 (note my e63 is pre-March 2007)from my personal experience.
Suitable for e36, e34, e30
Suitable for: e39 (all), e46 (all), e38, e53.
Here’s an image of the OBD II Diagnostic USB Cable KKL409.1:
This cable has a built is USB to serial adapter so the disc you get with the cable is usually just the drivers for this adapter. These will have to be installed no matter what car you’re planning on diagnosing. Do some further research on the settings required for this cable, you might have to tweak a setting or two.
Here’s an image of the wiring modification to get it BMW compatible, circuit diagrams are available in the thread linked above:
Suitable for: 2001-on e39/e46/e53
4. K+D CAN Interface
OK, this is my current favourite in my cable chest! This does 2001-on cars right up to & including 2011 cars (may be limited by the hookie software for cars after June 2008 on a diminishing basis as the car gets newer). This cable is a USB enabled device, again you will need to install the USB to serial drivers. However you will also need to install the K+D CAN utility, this allows you the ability to switch it from a K CAN device for pre-2007 cars (see list above) to a D CAN cable. There are two versions of this utility, a fancy GUI & a MS DOS one. I find that the MS DOS one works best.
Hera’s an image of what this cable looks like:
I mentioned in an earlier post that there is an adapter that is required with this cable if you want to use it on a K CAN car. It re-enables pin 8. The reason they eliminated connectivity to pin 8 in the D CAN is something to do with stability of the Ethernet connection for D CAN.
Here is all the information you will need:
How to set up INPA cable & software
INPA Windows XP/Vista/7/8/10 installation inst ruction:
BMW INPA cable reading 8 pin K-line
INPA K+DCAN cable vs. ENET cable vs. BMW ICOM (Next/A2)
The most important tip:
INPA 6.4.3, 5.0.6 and 5.02 download links
This is the K+DCan utility that allows you to toggle between K line & DCAN. Failure to run this correctly will mean that you will not be able to use your cable. Note: you should only have to set this up once for your car & it will remember the setting.
There is also a DOS version of the tool above that works equally well.
Interface suitable for: 09/2001 – onwards.
5. Do it auto Interface
This is identical in operation to the cable above but is appears to be dearer but probably manufactured to a better standard. K + D CAN capable.
I have no first hand experience with this cable, it just hard to justify with all the other cables I have!
Interface suitable for: 09/2001 – onwards.
I’m no expert but I have picked up a lot of information in the past while.
Hope it’s helpful
Here, you will get answers to questions below:
It is possible to use an “old” vcds or vagcom kkl cabel and use it for newer bmw (2004-2011) with the software inpa?
Only short the Pin 7&8 from my vcds cable, and use it for bmw?
This is a 100% compatible interface and the explanation + schematics over the BMW mods.
It could be your interface which seems not fully following the special modifications that an OBD serial INPA/GT1 interface should have on top of a standard serial OBDII interface. You can most likely do the modifications yourselves to the interface (if you know anything about electronics and have a Volt/Ohm meter to check for Voltages and contact over the pins)
100% compatible with INPA and DIS (actually with EDIABAS STD:OBD)
Here how a true KL interface looks (work for std OBDII serial diagnosis software (not ELM type software)):
click to enlarge
Please observe the 1-4 OBD reference is for the internal connection card to the OBD socket, the schema below lists the corresponding OBD pins.
Here the mods a std OBDII serial KL interface needs to have to be BMW diagnosis compatible (works also with BMW scanner demo, would assume Carsoft would also work but have’n tried it as Carsoft doesn’t bring anything when you have INPA/NCS and GT1), as modified schematic and in words:
Here the mods it has over the std interface above:
1. pin 7 and 8 of the OBD interface connected
2. uses DTR instead of RTS (pin4 on sub D RS232) 3. Pin 1 of OBD is connected to DSR (pin 6 of a sub RS232) over a 1k resistance (for shorts protection) 4. RS232 RI (pin 9 of sub D RS232) is connected with OBD pin 16 (+ battery feed to detect battery signal) over a 1k resistance (shorts protection, the diod is polarity protection).
Note:
most INPA cables from China are copies of this interface schematic (or a similar design), it is openly published so they use it. But you can not be sure that the chinese guys did all the 4 modifications as per above, if you want to be 100% sure order the kit and build it or have it soldered by someone who can. But the easiest way is perhaps to buy one off obdii365.com and check the 4 points above, if they are ok the interface is most likely ok as well.
Hopes this can help someone.
Here’s the research on that delivers following products (VAG best key tool):
1) VVDI2
2) Abrites
Now, will talk about the two by immo systems:
in detail…
Part 1: VAG 4th immobilizer system
VVDI2:
VW/Audi/Skoda/Seat/Porsche/Bentley vehicles all have 4th immobilizer car:
Abrites commander:
(again the immobilizer is stored in the cluster but now it spreads to other models too. The difference between IMMO III and IV is very slight and it is often hard to differentiate between the two. For this reason they are basically considered to be one type).
Examples:
– IMMO II (the immobilizer is stored in the cluster).
Examples:
– IMMO I (external IMMO box).
Examples:
Part 2: VAG 5 th immobilizer system
VVDI2:
This type use VAG immo5 transponder or OEM key Support following cars: A4 (2009-), A5, Q5, A6 (2012-), A7, A8(2011-), Touareg (2011-)
Abrites:
(this is the current generation of immobilizers, in it we can see not just the spreading of the immo in different modules but also the significant enlargement of the component security which is divided between the modules).
Examples:
Part 3: MQB system
VVDI2 for VAG MQB:
mqb authorization is free, if you have vvdi2 full authorization, vag 4th immo authorization, vag 4th & 5th immo authorization, copy 48 96bit authorization
VVDI2 MQB vehicle coverage:
VVDI2 works for MQB NEC35xx immobilizer/ dashboard below:
Audi A3/S3 2014+
Audi Q2
VW Golf7
VW Polo(MQB)
VW Tiguan II
VW Touran II
VW crafter 2017+
VW Passat B8 without virtual cockpit
Skoda Octavia III 2014.07+
Skoda Rapid 2015.06+
Skoda Kodiaq
Skoda Superb III
Seat Ibiza/Ateca/Toledo 2015.06+
Abrites for VAG MQB:
MQB ( GOLF 7, A3 8V, Octavia A8, etc.) ALL KEYS LOST or additional keys. for cars with VDO, JCI and Virtual Cockpit cluster.
There are two procedures to complete this procedure:
CARS UP TO 2018 supported for key programming here are the supported types starting from the oldest to the newest, the models are just examples and do not represent the full list. Complete IMMO I – IMMO V solution:
Attachment:
VVDI2 VAG User Manual:
Abrites Commander VAG User Manual:
Yanbua Mini ACDP free updated OBD read/write BMW CAS4/CAS4+ (2019-11-15). Support IMMO programming (add key & all keys lost) and mileage reset for all known versions via OBD.
Here’s the demo on adding a new CAS4 key using ACDP Mini via OBD in less than 3 minutes.
Requirement:
Yanhua ACDP mini host
Original key and a new key
Procedure:
Connect ACDP programmer with vehicle via OBD socket
Run ACDP APP on mobile phone and make sure ACDP has connected
Select BMW->CAS1-4-> CAS4/CAS4+ ->OBD Mode
Select OBD mode IMMO/mileage ->Add key (automatic mode)
Identify vehicle information and confirm
Yanhua ACDP requires to pre-process ECU
Press Continue
Perform backup coding
Auto saved coding data.
Pre-process ECU in progress until finished
Put the working key close to the Start button antenna position
Check and confirm VIN & ISN code
Select a blank key position to add key
Put a new key close to the Start button
Learning key in process
Program new key success.
Yanhua Mini ACDP will auto saved new key data.
Test the new key.
Done.
Video guide:
http://www.key-programmer.org/2019/11/18/use-yanhua-mini-acdp-to-obd-add-bmw-cas4-key/
Look here: How to do adaptation using ODIS-Service software for control modules with KWP or UDS.
The configuration and operation differ depending on whether the adaptation will be performed with KWP or UDS control modules
Control modules with KWP protocol
At the beginning of the function, the function version must be selected first on some control modules
After selecting the function versions and confirming with OK,the Adaptation view is shown.
First, a adaptation channel must be selected there.
KWP1281 has channels 0 through 99, KWP2000 has channels 0 through 255.
In both cases, channel 0 as a special function:
Selecting is resets all control module adaptation channels.
To select a channel in ODIS, [1] enter channel number in the entry field click Select Channel or with Enter to confirm.
The value is checked for correctness when it is entered. If the number is outside of the permissible value range or
if the field is empty, the field appears in red and the Select Channel screen button is deactivated.
Select Channel: Selects the channel entered.
New adaptation values are entered in the Entry [2] field.
Actual Value: The adaptation value read from the control module.
Test value: the current test value. Initially identical with the value in the actual value column.
Input: the value entered by the user. Initially identical with the value in the actual value column.
There are four screen buttons on the right side of the view:
Send test value: Send the value from the Entry field for testing to the control module. The value is stored there
only temporarily.
Transfer: programs the changed adaptation value into the control module. This value is stored permanently.
Reset: resets the test value to the original value.
Reset all: if test values were set on more than one channel, they will be reset to their respective initial values as long as the new values were not programmed into the control module using the Transferfunction. This screen button does the same as channel 0. The user must confirm this action in a dialog:
Yes: Resets the test values on all channel to their original value.
No: Closes the dialog without resetting the test values.
As long as it is supported by the control module or its data, measured values [3] are read from the control module
and shown in a list and are updated periodically.
To change the adaptation value for a channel, complete the following steps:
is then sent to the control module as the new test value. This process can be repeated as often as desired. A validity test is not performed while entering. If the entered value lies outside of the valid value range, the Entry field turns red and the Send test value and Accept screen buttons are deactivated.
Example:
Four channels were selected in the illustrations above. For the instrument cluster control module used here in the example, the language shown is set in this channel. Value 1 stands for German and value 2 stands for English. If the user now sets the test value to 2, all messages in the instrument cluster display will appear in English until another test value is entered, the Reset button is pressed or another channel is selected.
As long as the changed value has not been saved in the control module yet, the user can click the Reset button to reset the test value back to the original value (which is the value in the Actual Value column). The test value is also reset when a new channel is selected or when changing or closing tabs.
It is also possible to apply a newly entered value without Send test value.
Control modules with UDS protocol
With UDS control modules, all of the available adaptation functions for the selected control module are listed in a table when you switch to the Adaptation tab. They can be used to change the control module adaptation values.
This is shown in the following illustration using the control module with diagnostic address 17 (instrument cluster):
The adaptation functions table has four columns:
Adaptation/Parameter: the name of the adaptation function or parameter.
Current value: the parameter value read out from the control module. Input: the new parameter value. Click in the Input column for the desired parameter to change the value. The new value can be selected from a list or entered as free text, depending on the parameter type [3] .
Unit: the unit of the adaptation value.
Each ODIS adaptation function [1] has parameters [2]. They are hidden by default. You can double-click in the line or click the + in front of the function name to display them. Double-clicking again or clicking on – hides the parameter list again.
To show the parameters for all functions at once, click the [+] button at the bottom right of the table. Clicking [-] will then close all of the open parameter lists at once. Opening the lists may take some time, depending on the number of available functions.
Note:
All values that have not been saved or lost when parameter lists are closed. A message will warn the user about this:
Yes: the values that were entered are discarded and the parameter list is closed.
No: the parameter list stays open and the values entered remain.
There is an entry field under the table which can be used to filter the adaptation functions.
Filter: If texts or partial texts are entered in the filter field, then only the adaptation functions are displayed, that contain the name of the text or partial text.
There are three screen buttons at the bottom of the view:
Restore: restores the value for the selected adaptation function that was saved in the control before the last programming procedure. Clicking the button displays the last values used in the Input column. These apply only to the adaptation values visible. To program the restored values into the control module, click the Transfer button.
Restore all: restores the value for all adaptation functions that was saved in the control before the last programming procedure. Clicking the button displays the last values used in the Input column. To program the restored values into the control module, click the Transfer button.
Transfer: once the values for all desired adaptation channels have been changed, they can be saved by pressing the Transfer button. These apply only to the adaptation values visible. The user must confirm the saving process:
Yes: the new adaptation values will be written.
No: the adaptation values are not written into the control module.
Reset control module: this option is only active for control modules that support it. If there is a check mark, the control module will be reset after programming the adaptation values.
Before saving, a validity check is performed on the parameter values that were entered as free text. If this check is not successful, the values will not be written into the control module and the user will be informed about the cause in an error message:
If the new values were saved successfully, then will then be displayed in the Current value column.
Using the keyboard:
Using the arrow keys on the keyboard allow you to navigate between the individual lines in the table. In the edit mode in the Entry field, you can change using the spacebar or the F2 button. Using the enter key applies the new value. Using the ESC key leaves the edit mode without applying the value.
If you need VAG online programming account/service for vas5054a, vas6154 etc, please contact us
(11/14/2019) Renault CAN CLIP reprogramming software is updated to version 191. Attach all details here:
in detail…
Part 1: Renault CAN CLIP 191 Download
Free CLIP 191:
Size: 2.70GB
Password: Not required
Renault Can Clip Registration file:
Source: MHH forum
Security: Unknown
Tested 10% working CLIP 191:
Security: 100% tested, use with relief
Confirmed to work with CAN CLIP interface like SP19-A (best quality), SP19-B (good quality), SP19-D(cheapest)
Part 2: CANCLIP 191 for Renault – New Features:
New vehicles covered: MEGANE IV ph2 and CAPTUR II CN
Part 3: Renault CANCLIP 191 Installation:
0ld RLT2002 can work ONLY on win x86 (32 bit version) !!
Open “A_ Patch file”
1st rep1ace the original Rswin.exe file (backup 1st your original file!!!) with the cracked .exe file in C:\CLIP. x91\L ib\Application\
You Done!
Video:
Part 4: CAN CLIP 191 Test by Pros:
Have tested on Renault Megane II… Diagnosis and reprogramming without issues.
Credits to engineers working for obdii365.com
|
AuthorCategories |