Lonsdor K518ISE Adds BMW 7-series F01 2010 CAS4 Remote Key Success
Program BMW X3 F25 CAS4 Key with VVDI Prog & Lonsdor K518ISE
|
This is an original Scorpio-LK Tango key programmer help file.
Purpose: write Megamos 48 component security
Component Security in Megamos 48 key
The modern immobilizers of the VAG-group vehicles have such conception as “Component Security” (CS). The CS is an array of 7 bytes length. Its role in a vehicle is to forbid a mixing of electronic units from different cars. In terms of the immobilizer the CS is a “password” that used in couple of the Motor Unit (ECU) and the immobilizer.
The protection scheme includes 3 components that share the CS, they are: ECU
IMMO KEY
The protection scheme allows the engine to start only in case when the CS is identical in all the three components.
Key and CS
The CS is a part of the Crypto Key and fills its upper area Word9-Word6.
ECU and CS
ECU uses the CS as a password. More modern ECUs contain only 6 bytes of the CS. In this case the CS should be extracted from another devices, for example it may be a dashboard.
IMMO and CS
The vehicle dashboard usually has a role of an immobilizer. The IMMO always contains all the 7 bytes of the CS.
The Tango key programming tool “Write Component Security 7 Bytes” (Megamos 48 window) helps you to put the CS manually into a transponder.
Example of ECU BOSCH Motronic M7:
ECU dump, eeprom 95040:

The CS has been marked in the blue color.
To write the CS, invoke the tool and type the CS in the window:

Select the vehicle brand and press the Write button.
Temporary the Seat brand is unavailable.
Link to Scorpio-LK Tango: https://www.obdii365.com/wholesale/super-tango-key-programmer-with-basic-software.html
http://www.obdii365.com/service/tango-key-programmer-write-megamos-48-cs.html
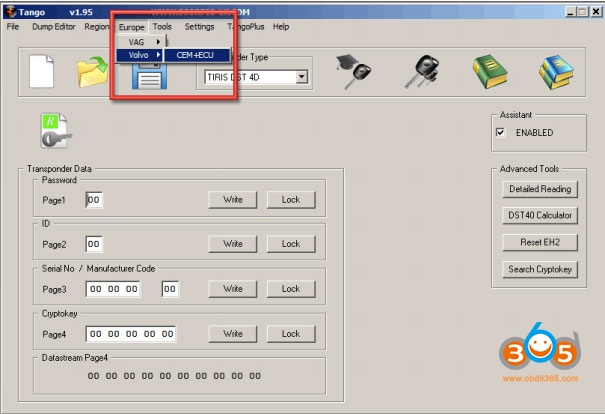
Purpose: This document here is aimed to show how to use original Tango key programmer to synchronize Volvo ECU and CEM
Tango hardware: original Tango from scorpio-lk
Tango software: version 1.95 or newer
Function to test: synchronize ECU and CEM modules in VOLVO vehicles
Preparation: in order to use the software, you will need to load a dump file from both ECU and CEM modules in Tango software. in case that one of the modules is broken or the chip contents are replaced, a file from a replacement (donor) module can be used.
ECU and CEM types covered:
CEM: 93C86, 28F400
ECU: 93C56, 24C04, 95P08
Any combination of the above mentioned can be synchronized.
Steps:
run Tango software and select key maker – dump editor

select europe – volvo – cem+ecu
software is loading…

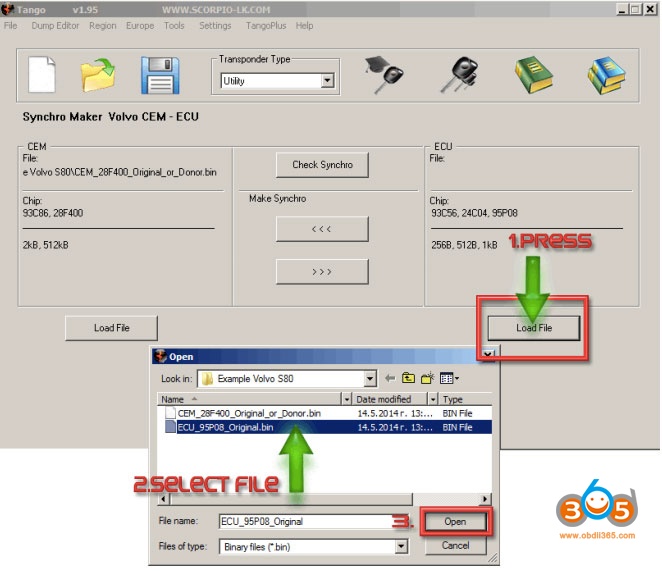
the synchronization of modules begins with loading dump files in Tango software. Here, the sync between CEM with 28F400 and ECU with 95P08 will be displayed
NOTE: It doesn’t matter which file is loaded first
will show how to synchronize the CEM module with the ECU
as a result of the whole procedure a new file for the CEM will be generated by Tango and this file is synchronized and compatible with the originally loaded ECU file. The reverse operation – creating a new ECU file compatible with the original CEM file can be used instead. the procedure is basically the same.
synchronization starts with loading a dump file from CEM
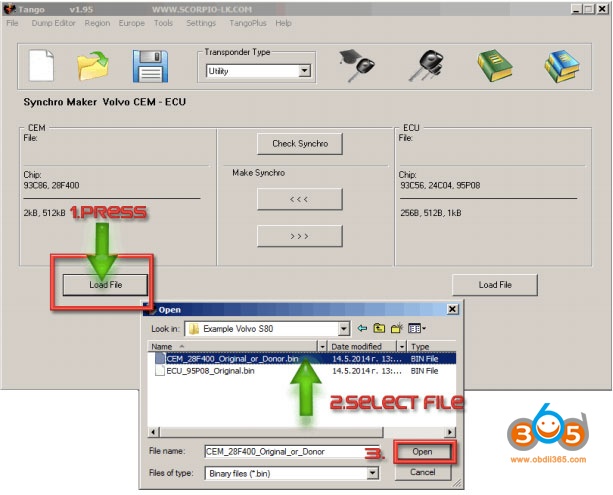
using the similar procedure load then ECU file
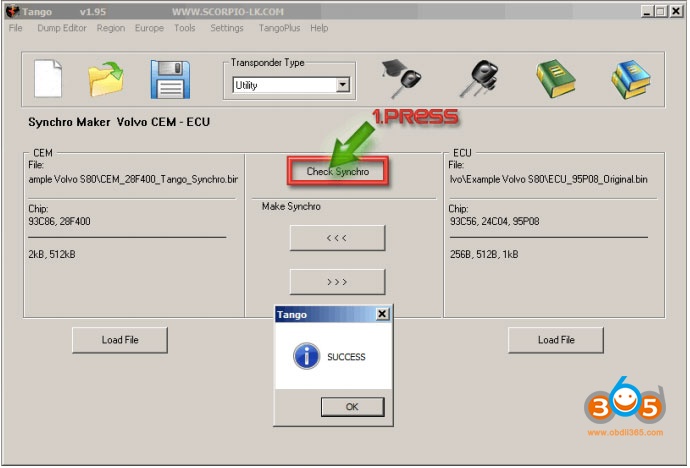
if you press the “check synchro” button now, it will display the following error because at this point files of the ECU and CEM are not synchronized
NB: if the files are taken from a working car, the error will not appear and will write “success” instead

to actually synchronize files press the arrows beneath “make sychro”.
the upper arrow that points left will prompt saving new CEM dump file that is synchronized with the ECU
the second button which points right may be used to create a new ECU dump file instead
choosing which function to use (create a new CEM file or create a new ECU file) is up to users’ personal preferences and basically there is no difference.
it may be a good idea to base your decision, which module to synchronize, on the unit where it is easier for you to reprogram.
here, rewriting flash 28F400 is more difficult than 95P08
therefore, it may be a good choice to generate a file for ECU and write it back
click the bottom button “make synchro” and save the new ECU file
in any case the newly generated file has to be written back in its corresponding module, which will allow both modules to work together once again.

after the new file is generated, it is advised to check the synchronization before applying it to the module. here, press “load file” under CEM selection within the software and select the newly generated by Tango file, which was created in the step above:

check synchro
then write back the new file in the corresponding module.
job’s done!
Here obdii365.com lists top 3 universal diagnostic scanners which have the wide coverage of 12v gasoline passenger vehicles, 24V light truck/pick up and diesel heavy duty truck, including American, European and Asian makes.
Launch X431 V+ vs. Xtool PS90 Pro vs. Fcar F3G scanner
*Correct us if we are wrong.
In Conclusion:
1.Launch x431 v+ supports Bidirectional diagnosis. The other two don’t.
2. X431 V+ and xtool PS90 Pro supports 2 year update free online.
3. Car coverage: X431 V+ > PS90 Pro > F3-G
x431 v+ supports Australian, Indian and Malaysian models. PS90 pro supports Australian models, but no Indian and Malaysian makes.
Heavy duty coverage: Xtool> Launch X431 > Fcar
As we can see Xtool comes with more truck adapters.
4. Fcar F3G comes with printer in default. The other two require extra printer.
5. X431 V+ is the only one supports ECU coding and injector coding function. But X431 cannot do odometer correction. PS90 pro cannot do coding feature but will adjust odometer. Fcar supports less special functions. X431 focus on auto diagnosis, ps90 pro focus on IMMO function and F3-G works better on diesel diagnosis.
6.Fcar F3G is popular in middle east area. PS90 Pro is welcomed by American customer and X431 V+ is sold all over the world.
Autel MaxiIM IM608 adds BMW CAS4/CAS4+ all series OBD programming (add key & all keys lost) in June 2019.
Make sure your Autel IM608 has registered with XP400 programmer adapter.
Here’s a demo example on CAS4 via OBD thought Smart Mode
Model: BMW 528i 2015 F10 CAS4+
smart key chip: Hitag Pro 49
add new smart remote via OBD 
Left: new key Right: original key
Procedure:
Turn on ignition Connect MaxiFlash JVCI to IM608 by USB to OBDII Connect XP400 via USB port 

In MaxiIM Im608, Select IMMO->BMW->Smart Mode 
IM608 detects immobilizer system: CAS4/CAS4+
Show immobilizer box, DME and EGS

Try to delete all fault code by clear code operation 


Delete fault code on CAS4 and DME
Select Key Learning->See all vehicle information/ecu information->Key Learning by OBD 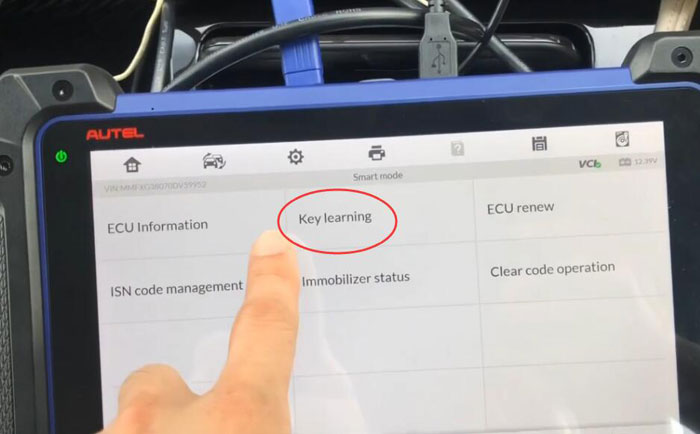


Follow instruction below to operate Read SK or load SK ->Write Key 
Key number: position used key 1, 2, 4 to try to program free key3

Press OBD read SK This process requires networking to obtain data, set up the network to ensure that it is connected to WIFI and keep this state during the whole process. Reading information about current ECU… 
This current software version is not supported need to upgrade first before read SK.
Execute upgrade with the Autel IM608 System Mode->CAS4/CAS4+ Immobilizer System->Programming Operation->ECU Upgrade


This process requires network connection as well. Wait 7-8 minutes, Don’t touch any buttons of vehicle Dashboard will normally be off and on 
After 7-8 minutes ECU upgrade successfully 
Go back to read SK by OBD 
Read SK needs program, and make sure the voltage is over 13V and stable.
Require network connection to obtain data. Download files 
Download to programming file completed Fine SK process time around 10 minutes Dashboard will normally be off and on 
Do you have working key? Yes 
Put a working key to start coil as close as possible. 
Now got SK password Input secret key->select immo ECU type CAS4+ 


Fill all SK Enter the secret successfully. Execute “Write Key” function Choose key position 3 and Write new key 
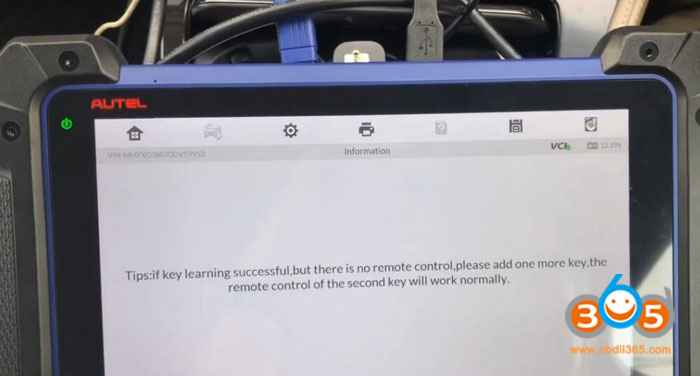
If key learning successful, but there is no remote control, add one more key, the remote control of the second key will work normally.
Put new key close to the Start coil. Ket frequency: 315Mhz 
Key learning in process 
Write key successful Put the key close to start induction coil, press and hold the ignition for 10s, after the learning is completed, the key can be normally used. 
Key number 3 already used. Test remote and start engine. 

Done.
see also:
BMW CAS4/CAS4+ by OBD with VVDI2, BMW Explorer, or Autel
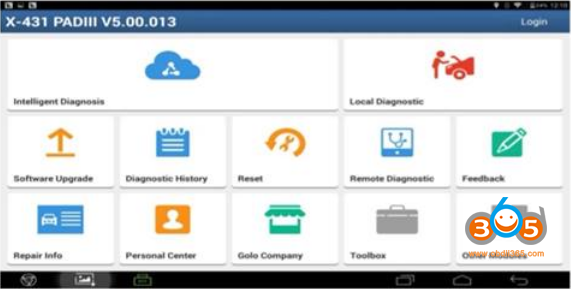
Tutorial: Mercedes- Benz 722.9 Gearbox Online Programming using Launch X431 PAD III diagnostic tablet.
Supported Mercedes models:
E, E, C, SL, M, B,A, CL series 280 ECU programming from Benz main system before year 2013 and part of year 2014.
Model tested: Mercedes W221 S280/300L
Preparation for programming:
Launch X431 PAD III main unit, connector, Pad III standard configuration USB cable 
Programming precaution:
1.Keep the vehicle voltage stable at 13-14V 2. The programming process don’t operate any vehicle electrical equipment 3. Don’t sit in the car when programming 4. Don’t start the engine and only open the ignition switch was ok 5. In order to ensure the speed and stability of programming. It was recommended to connect X-431 PAD III standard USB cable to do programming.
Programming process:
Select “Local Diagnostic”->Select Benz->Control module programming->corresponding system->Online download programming files (connect WiFi, login on account)->Perform programming->Coding
Detail Guide:
Select “Local Diagnostic”->Benz->Control module programming


The X431 PAD3 can automatically identify VIN code after control module programming, confirm VIN and vehicle information

Enter the corresponding system programming, here choose gearbox 722.9 as an example to select the automatic transmission control module

Select “Control module programming” 
It had some risk to do programming. Check the risk tops and precautions, press OK to continue
The following step was for the old ECU data written to the new ECU data. If the old ECU completely damaged directly click “Cancel”, and then follow prompt to operate it. If the old ECU could read the data so suggested follow steps below to carry out.

Switch off ignition
Remove new control unit Install old control module 
Switch on ignition Adaptation data are being read. 
Switch off ignition Remove old control unit and install new control unit 
Switch on ignition Check the EHS number engraved on the underside of the electrical connector on the value. If not, select “Edit” to enter the correct EHS part number and select “Continue” 
Select “Download” to start downloading the files needed for programming because there may be more one file, so possibly has multiple download tips 
Click on “Confirm” to continue after downloading successfully. 
List the specific file name and some precautions needed to be programmed, select “Yes” to start programming 
It had some risk to do programming, may lead control module to abnormal. If control module was normal, not recommended to continue. If you want to program, select “Yes” to start 
The Launch X431 Pad 3 will prompt programming process until 100% completed 
Control unit programming was completed successfully 
Perform coding function after programming, will read data from old ECU written to new ECU
Switch off ignition
Switch on ignition
The coding has been carried out.

The all reading data from old ECU will be written to new ECU after coding completed. If the new ECU fully matched this car and no fault code so needed not to do SCN online coding function, so end programming. Otherwise you need to do SCN online coding function. 
The following procedure was for SCN online coding function. if the vehicle as normal after programming so you ignore all the next operation step. Otherwise select the SCN coding (online code) menu 
Click “Yes” after keeping the internet connected 
Select “Download” to start downloading the coding files, there may be more than one file, so it prompted to download several time 
Downloaded successfully 
Perform coding function after clicking confirm and prompt wait time 
Need to reset ECU after coding completed. Turn off ignition and wait 10 seconds. And then turn on the ignition. The coding was completed.
Switch on ignition

Coding has been successfully completed
If you cannot start engine after coding completed, access to special function and perform”driving license” or “initialization” function

Done.
Look here:
Part 1:Test reports: VAG vehicles change mileages by OBDSTAR X300M thru OBD2
Part 2: Vehicle coverage: VW/AUDI/SKODA/SEAT on X300M OBDSTAR
Note: OBDSTAR X300 DP PLUS has the best vehicle coverage since the update is the most frequent while other OBDSTAR tools like X300M doesn’t update as well as X300DP PLUS.
in detail…
VW change km using Obdstar X300M:
2012 VW Jetta- OK
VW Passat B7 digiprog3- OK
2014 VW Tiguan-failed
Prompt “Communication breakdown”
2011 VW Golf 6-failed
Communication breakdown
Golf 2013 with black/white screen: OK (with latest update)
Golf 6 2012 white color: write 2 sec !!
Polo 2014-10 MQB 20 seconds all ok
Polo 2004: VDO k Line–> mileage OK
Polo 2014: White Meter NEC24C64 using golf menu–> OK
Polo 2014: with NEC24C64–> ok
Tiguan 2013: TFT color dash nec+24C64–> ok
Tiguan 2012 tft color NEC24C64 ok
Volkswagen caddy 2014: white meter NEC24C64 via obd–> ok
Passat 2009: mileage nec+24c32–> OK
Volkswagen Amarok 2014 ok: chose golf NEC 24C64 white meter 2013–> ok
AUDI change km using Obdstar X300M:
2014 AUDI A5 – X300M OK 31min
2016 Audi A3 TFSI MQB done in 2 minutes with X300M. Resets all trip computers/clocks etc but easy enough to set again.
Audi S3 (8V) 2015 MQB done no problem in a few minutes
Audi a4 b8 2015 obdstar x300dp cant change odometer. Spent one hour but in the end nothing.
Audi A3 2008 monocolore: OK
Audi A4 2007: in 20 seconds by OBD–> ok
Audi a8 2006: OK
Audi Q5 2013: via obd–> ok
Audi normal a6 2009: ok
SKODA change km using Obdstar X300M:
Skoda Superb 2017.
Read and show km ok. Write new km ok. ……before (Read/safe backup data) and then set km. 5 min and job done. using OBDSTAR H110
Skoda Octavia VRS MQB 2015 done using X300m, no problems
Skoda Octavia 2010: nec+24c32 VDO mileage OK
Skoda Superb 2012: via obd–> mileage ok
SEAT change km using Obdstar X300M:
Seat Ibiza 2014: Via obd –> ok
Part 2: OBDSTAR X300M VAG vehicle coverage
(released at the OBDSTAR official website)
VW Odometer Correction
Software version: 30.72
VW
Bora
VDO K line
2009- NEC+24C32 VDO
Read write mileage
Read EEPROM
Write EEPROM
Beetle
NEC+95320 MM
Beetle k line
Caddy
CADDY
2008- CDC
2008-
Polo
2010(NEC+24C32)
Read write mileage
Read EEPROM
Write EEPROM
NEC+24C64 VDO
NEC+95320 MM
VDO K line
Sagitar
2006
2007-2010 CDC
NEC+24C64 VDO
Scirocco
2008- CDC
2008-(NEC+24C32)
Read write mileage
Read EEPROM
Write EEPROM
NEC+24C64 VDO
Sharan
VDO K line
T5
VDO K line
Tiguan
9S12XHZ512
2008- CDC
NEC+24C32
Read write mileage
Read EEPROM
Write EEPROM
NEC+24C64 VDO
NEC+95320 MM
Touareg
2003-2007
2008-
Touran
2006- CDC
NEC+24C64 VDO
Transporter
NEC+24C32
Read write mileage
Read EEPROM
Write EEPROM
NEC+24C64 VDO
AUDI Odometer Correction
Software version: 30.72
Audi
A3
2003-2006
2007-
A4
RB4 2002-2005
RB8 2006-2007
A4L
2008-2012
2013-
A5
2008-2012
2013-
A6
1998-2004
A6L
2004-2008
2009-
A8L
2003-2006
Q5
2008-2012
2013-
Q7
2006-2008
2009-
R8
R8 2007-
S5
2008-2012
2013-
S8
2007-
TT
TT 2007-
SKODA Mileage Change
Software version: 30.25
Skoda
VDO K line
CDC 2007-
Fabia
VDO K line
2007-(NEC+24C32)VDO
Read write mileage
Read EEPROM
Write EEPROM
NEC+24C64 VDO
Octavia
-2006
2007- CDC
2009-2010(NEC+24C32)VDO
Read write mileage
Read EEPROM
Write EEPROM
NEC+24C64 VDO
Superb
NEC+24C32 VDO
Read write mileage
Read EEPROM
Write EEPROM
NEC+24C64 VDO
SEAT Mileage Change
Software version: 30.25
Seat
VDO K line
Altea
NEC+24C64 VDO
Ibiza
2009(NEC+24C32)VDO
Read write mileage
Read EEPROM
Write EEPROM
NEC+24C64 VDO
Leon
2009-2010(NEC+24C32)VDO
Read write mileage
Read EEPROM
Write EEPROM
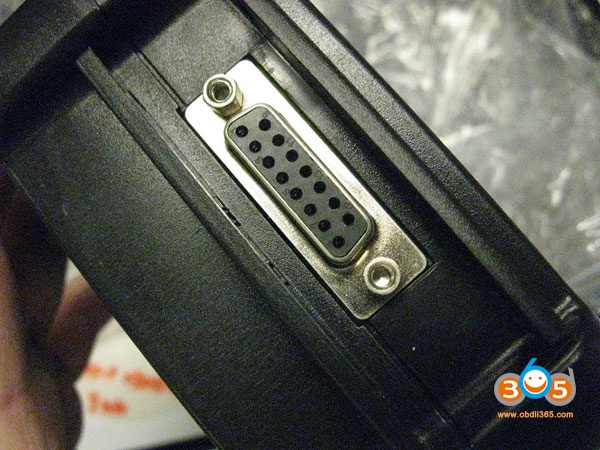
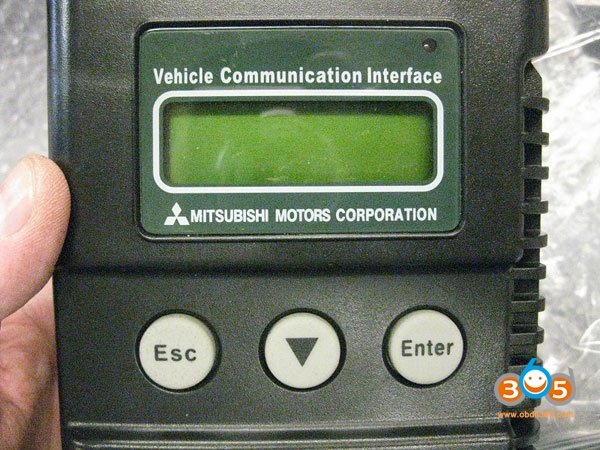
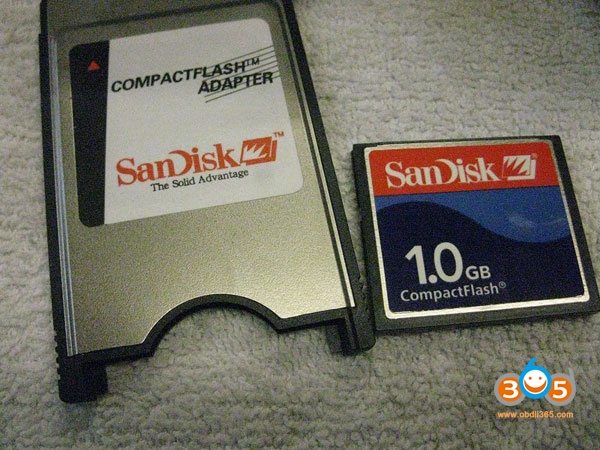
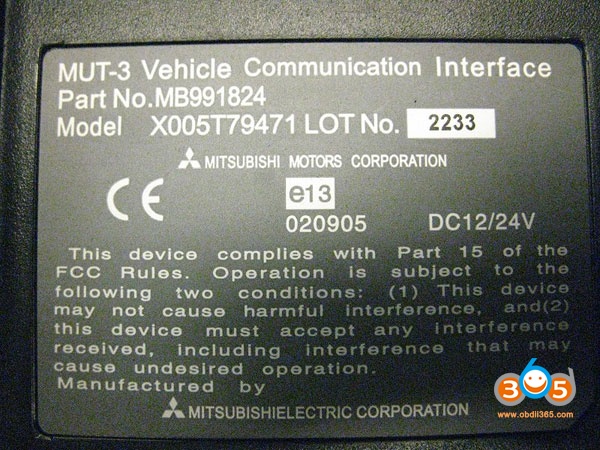
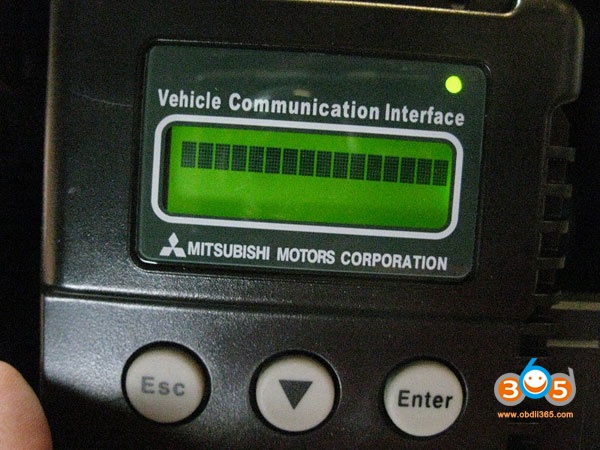
For no particular reason to qualify my sanity, I purchased a M.U.T. III (aka MUT3, Multi Use Tester v3 ) for my EVO X toolkit collection. After browsing on the web, I selected a unit off obdii365.com (seems all of them are from China) that appeared to meet my needs, included a later version of software (ALL of them come with software), a CF programming card and specifically stated it was a programming version. It arrived 4 calendar days later. Included a hard case, a V.C.I (Vehicle Communication Interface) box and several OBD2 adapter cables. The VCI connects to the OBD2 port on the CAN bus via an included cable, then to a USB port on the computer with a standard A/B USB cable. Then the computer speaks to the car via the VCI connection.
After browsing the MUT3 manual (available here: http://efichip.com/files/MUT-3/MUT-3_manual.pdf) I learned that the blue cable is appropriate for all CAN-bus Mitsubishi cars. The red dual-head unit is for FUSO trucks.
The PC needs to run the MUT3 diagnostic software which came on one DVD with two subdirectories on it. One part of the two software components, PRG12031, contains the MUT3 diagnostic software that must be installed first. This can be installed from the DVD or by copying files/directories to the HD and installing from there. Execute the Mut3Check.exe file. It is recommended to install onto Windows 2K or XP running IE6 or IE8. The documentation states problems running under IE7; the MUT3 application runs inside Internet Explorer. I have read about successful installations with Vista and Win7 on the Internet; however I did not attempt this.


Initially there were LOTS of errors installing the diagnostic software. It presented lots of totally unrelated errors and complained about a password being too short (“Error: The password is shorted than required”). The XP SP3 notebook I selected to install to had been a part of my AD domain and had minimum password length and complexity rules already in place. The SW package installs a lite version of MS SQL 2005 and stores all its data in assorted MDB database files (Access). Apparently the installation uses simple, short passwords (more on this later). First hurdle fixed by changing Local Security Policy.
Next I experienced loads of other installation errors: “FDICopy() failed”; “It was not updated normally”; “Failed to setup database”; etc. After uninstalling, cleaning the registry of scraps and re-installing several times I finally got the diagnostic package to finish without error. After the forced restart, I selected to install the other package, the database updates (programming data). It ALWAYS failed when installed from the DVD and/or after copying it to the HD.
At this point I decided to Ghost my current notebook image (contains ECUFlash, EVOScan, and some other stuff I wanted to save), then re-installed from the original media to factory new condition. Yep, I save everything.
Then I uninstalled all the trash software that comes in a new notebook from the SONY. I installed XP SP3. With a clean install, I made another Ghost image as a starting point. Installed the diagnostic software without error. Another image saved.


Attempted to install the programming date update, I always received “Database update error occurred. Update is cancelled.”. Grrr. I looked in the subdirectory that had the programming updates in it, reading all the ini & text files, the assorted CSV files, learning what it was attempting to do to install the updates. I discovered a simple programming error: It will not install if not run from a root directory! I copied that subdirectory to a new CD with only those files on it and the EXE file in the root. Success! The data files updated. Now to play with the application and see what it has to offer.
Connected the VCI to my 08 MR and then to the notebook. The car was recognized, assorted settings are available to be programmed or changed (TPMS, door lock settings, wiper speed settings, etc. And all the expected CAN bus stuff, SAS stuff, and code checking/clearing. So far, so good.
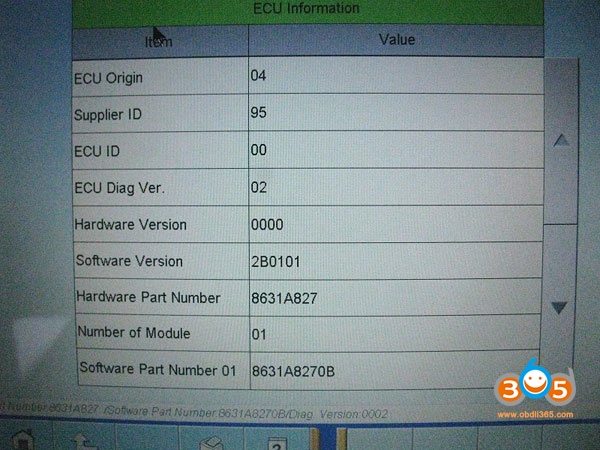
I read though assorted screens in the MUT III program and took copious notes on the part and software numbers assigned to things I knew like the ECU and TCU. Most of the software numbers are Mitsubishi part numbers and not related to what we know as the ROM ID. The only number I could recognize is the MFI (engine) software version of 526921, representing a ROMID of 52690021. For example:
ECU Origin 04
Supplier ID 85
ECU ID 00
ECU Diag Ver 01
Hardware Version 0000
Software Version 526921
Hardware P/N 1860A980
Number of Module 01
Software P/N 1860A98006
Chassis VIN JA3AW56V98Uxxxxxx
CAL-ID 1860A9800601
CVN 68DBA0D4
TC-SST:ECU Origin 04
Supplier ID 95
ECU ID 00
ECU Diag Ver 00
Hardware ver 0000
Software Ver 280204
Hardware P/N 8631A379
Number of Module 01
Software P/N 01 8631A3790B


In any case even I managed to get the software and data updates installed, but it would not ID any program files as being applicable for my car. Grrr…
Next I started searching for an OLDER version of MUT3 software. A member here offered 11121 so I uninstalled my current 12031 (actually reset back to an earlier Ghost image). That version does see the car but does not show any applicable updates. I decided to install the later TCU software since I knew the file number to use, 8631B001.cff.
The TCU file installed correctly. And it even worked! BTW – I disconnected both radiator fans and connected a charger to the terminal next to the master cylinder under the hood (much easier than accessing the battery in the boot) and the cigar lighter charger to the notebook. Programming took about 6 minutes and did not set any codes afterwards. When looking into the TC-SST programming section, “Teach-In Mode” now shows up as an available button where it was not displayed previously..
Car started, ran and drove. Shifting was harsher under part-throttle modes than before. Success!
Looking over the directory containing other .cff files (ROM data files), it’s REALLY difficult to figure out which ones are for EVO X models. I did find two for UK EVO X, but none for USDM (MMNA). Maybe someone else has a listing to convert between “1860A98006” and 52690021??
I’m starting this thread to discuss information and assorted successes/failures with MUT3 devices and their software.
I started reading the assorted MDB files the MUT3 application uses to store data. They all use simple passwords to lock the files – easily cracked with appropriate tools. There is LOTS of useful data in a file named VIN_Search.mdb, 177MB in size. Password for that file is DGPLQ_UNN.
That’s it for now.


What is the best programmer to read TMS370 mcu, vvdi prog, Orange 5, Xprog or other programmers? Let’s check it out.
Orange 5
Orange 5 definitely no problem with TMS370
But it require TMS370 adapter and license for instrument TMS370/TMS374/TMS375.

2) OEM Orange 5
TMS370 adapter comes default in package and does not require license.

Orange5 clone works well.
Support EEPROM programming of TMS370 series CPUs.
You should weld everything, try that, it will surely work in a good way.
Xprog box reads TMS379 smoothly
I’m using Xprog m version 5.6 and it’s a clone but it works just fine and haven’t had any issues with it so far.


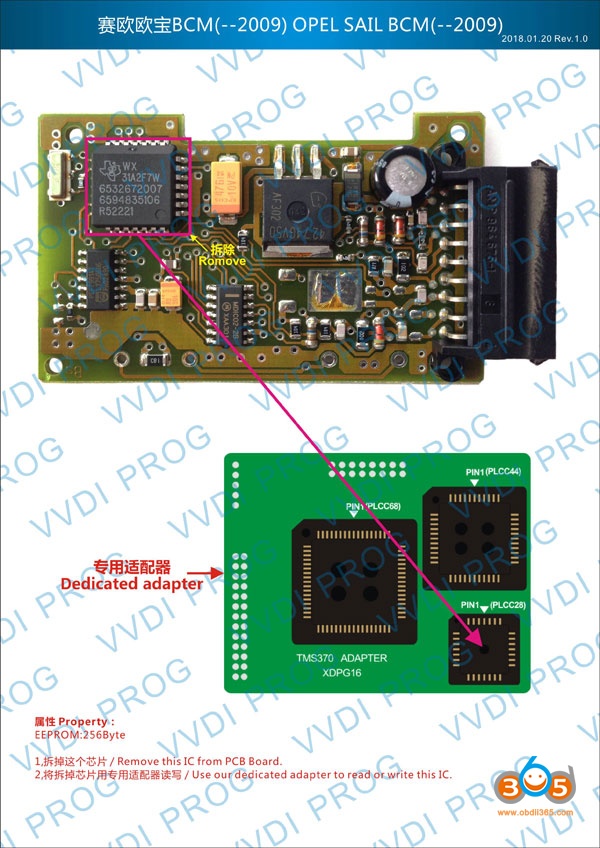
To read TMS370 mcu, you need extra TMS370 adapter
vvdi prog supports following TMS series mcus:
Add TMS370C002A, TMS370C010A, TMS370C012A, (Need TMS370(PLCC28) ADAPTER)
TMS370C020A, TMS370C022A, TMS370C032A, TMS370C040A, TMS370C042A, (Need TMS370(PLCC44) ADAPTER) TMS370C050A, TMS370C052A, TMS370C056A, TMS370C058A,TMS370C256A (Need TMS370(PLCC68) ADAPTER) options in <2-MCU>->
Wiring diagram example:

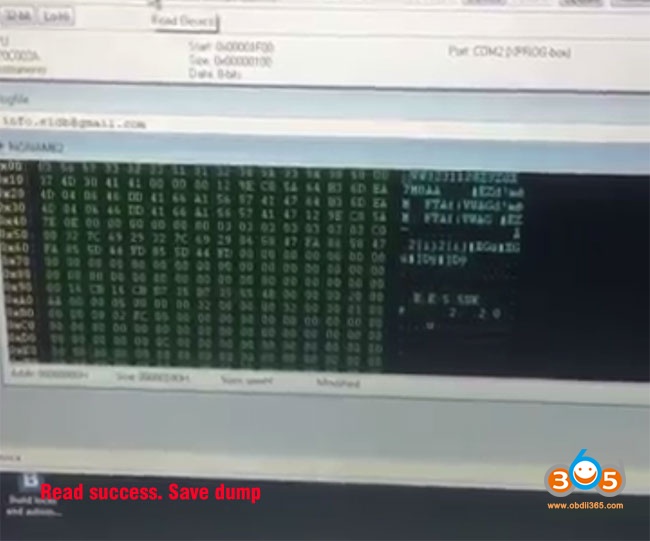
Read & write the old Jetta Immo box
Read & write Opel Audio module
Note: If vvdiprog gives error “chip into connect”, please clean the pins of processor, then retry again.

UPA requires TMS370 adapter as well.

UPA can read following tms series: TMS375c006TMS370cx36, TMS370cx42, TMS370cx0x, TMS370cx5x
Example: Reading Opel TMS370 with UPA Programmer


It is a cheap and dedicated programmer for TMS370.
It is the most useful tools to program the TI TMS Microcontroller EEPROM (TMS370CX6X, TM370CX5X, TMS370CX4X, TMS375C006);
Odometers models:
Renault Laguna, Espace Jaeger, Lancia Kappa Jaeger; Supports all dash versions with 68 pin PLCC TMS370C756, TMS370C456 and with 44 pin PLCC TMS370C456;
IMMO Pin code models:
Opel, VW, Nissan (Almera, Primera) etc
Car radios models:
DELCO GEO
DELCO OPEL CDR 500 DELCO 09351281 DELCO 16239661 DELCO CHEVROLET UL0 TheftLock (95-2000) DELCO CHEVROLET CD TheftLock (95-2000) DELCO CHEVROLET AM/FM+CD Delco LOCII (97) DELCO PONTIAC Family TheftLock (95-2000) DELCO TRANS SPORT AM/FM CD W/ EQ (98) DELCO TRANS SPORT CDM (M:16166661) TheftLock (95) FORD 2006 RDS TI FORD 2007 RDS TI FORD VW SOUND 1 FORD VW SOUND 2 OPEL CDR 500 GM0500 (DELCO) VW VW Sharan SOUND 1 RDS 7M0 035 156B VW VW Sharan SOUND 2 RDS 7M0 035 152B
Package including:
1pc x TMS370 Main Unit
1pc x PLCC68 Adapter 1pc x PLCC44 Adapter 1pc x PLCC28 Adapter 1pc x Serial Connect Cable 1pc x AC Adapter 1pc x CD 
It is the TMS370 specific eeprom programmer,
Supported devices:
TMS370CX6X
TMS370CX5X
TMS370CX4X
TMS370CX3X
TMS370CX0X
TMS375C006
TMS374C003A
TMS374C013A
Easy to use on Windows 95/98/2000/XP laptop.
Customer experience:
Xprog & Orange5 is the best for TMS370.
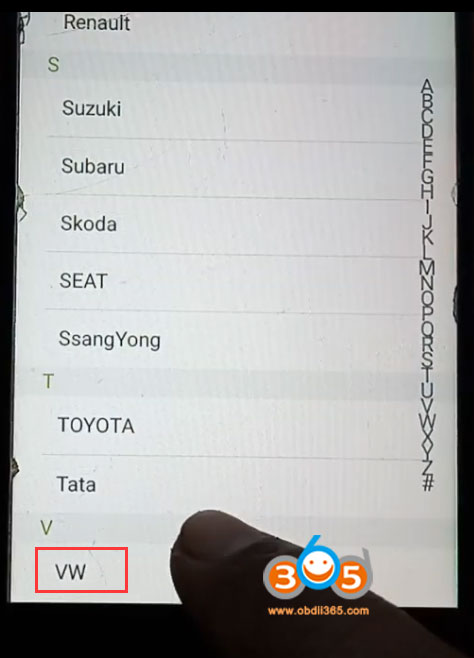
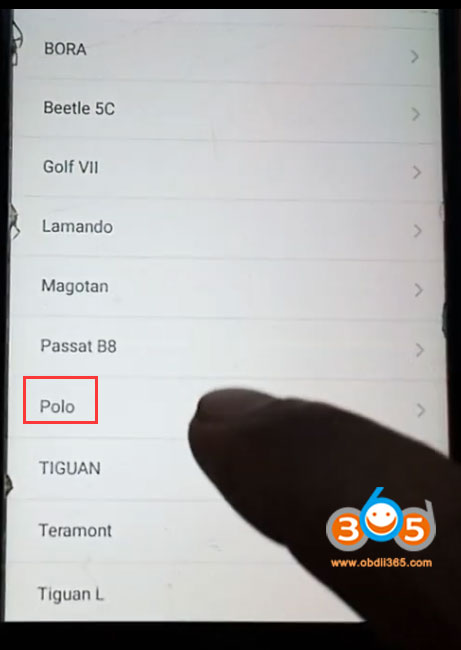
How-to: Volkswagen Polo remote programming with xtool X100 Pad and VVDI mini key tool. These both tools are very easy to use and cheaper.
Remote generate by VVDI Mini key tool Remote programming by xtool x100 pad Step 1: Generate remote 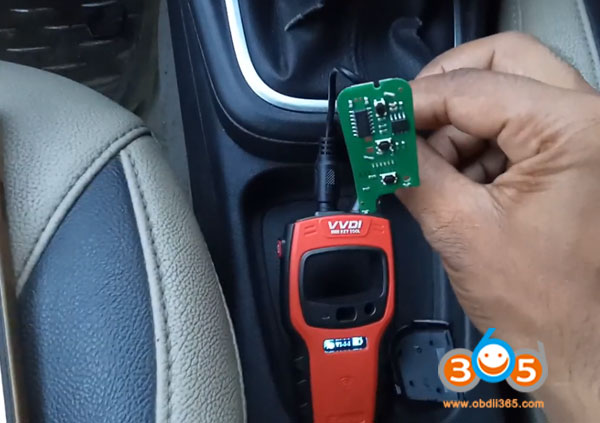
Remove remote PCB and connect it with vvdi key tool via USB cable In VVDI mini key tool App, select Vehicle Remote->VW->Polo and remote type 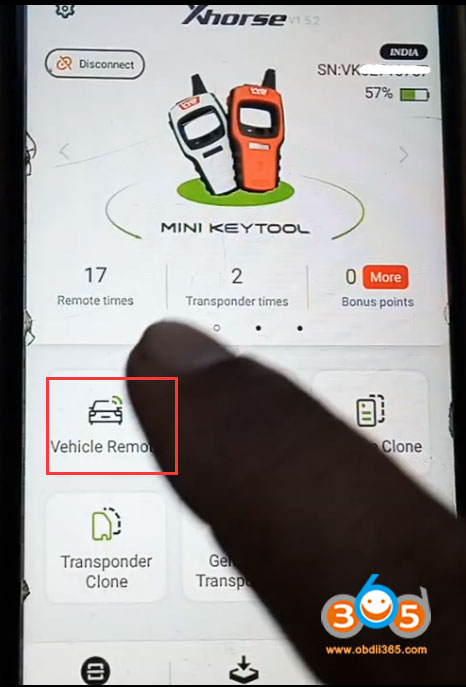
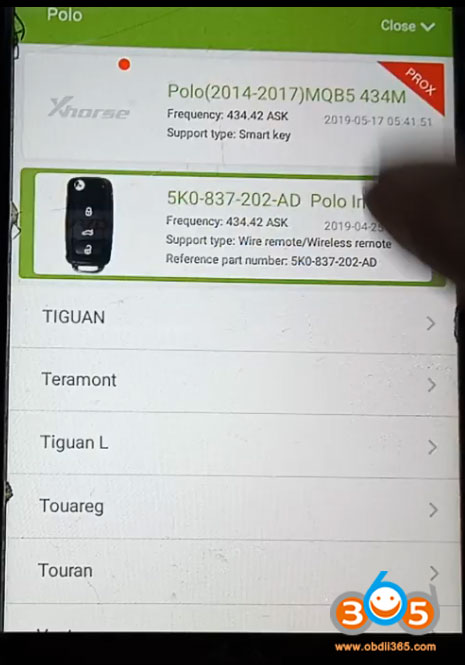

Press Generate 

Generate remote success. 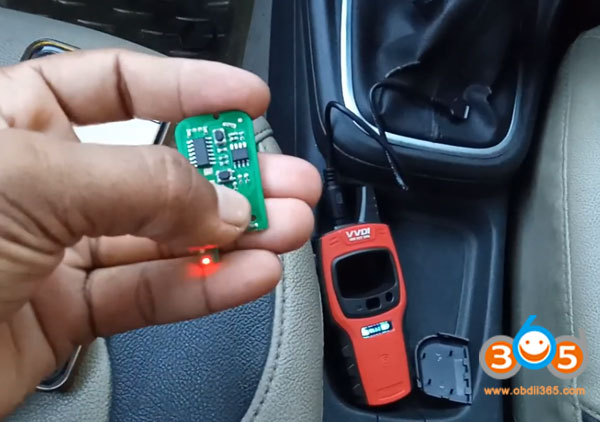
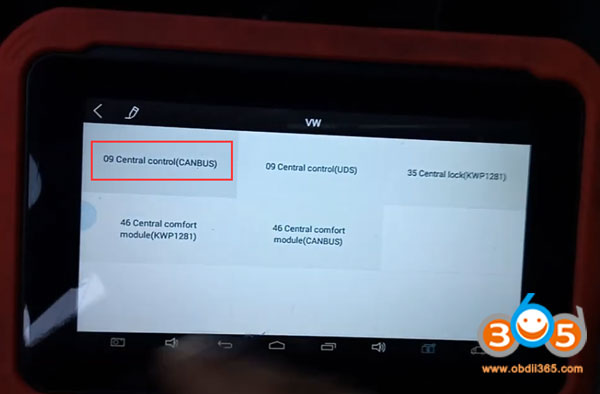
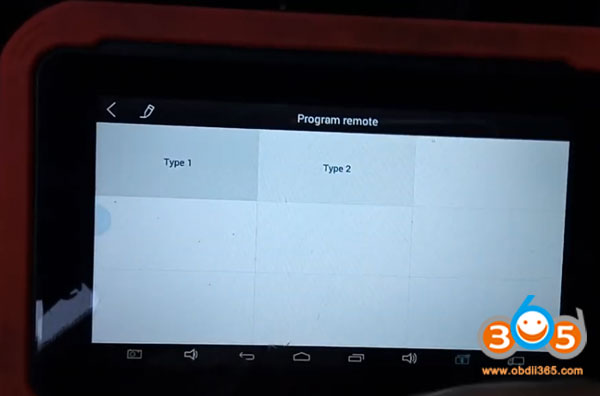
Install battery to the remote and install key shell. Step 2: Program remote In X100 pad, select Immobilizer->VW/Audi/Skoda/Seat V27.59->Program remote->Turn on ignition switch->VW->09 Central Control (CANBUS)->Type 1 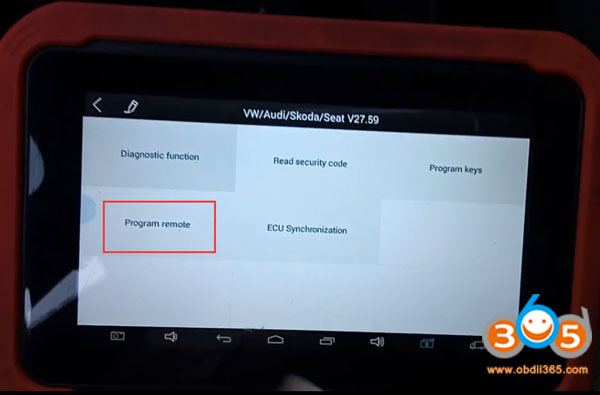


Press any button of the remote key 
Program remote success. Done. http://www.key-programmer.org/2019/09/06/program-vw-polo-remote-with-xtool-x100-pad/ Here comes the BMW, Mini Cooper and Rolls-Royce immobilizer list of Lonsdor K518ISE/K518S key programmer.
(Note: Models update till June 2019. Keep updating. Functions are under the free menu). BMW IMMO Vehicle List
Rolls-Royce IMMO Vehicle List
Mini Cooper IMMO Vehicle List
Lonsdor K518ISE review on BMW |
AuthorCategories |
 RSS Feed
