Flash reprogramming allows the Electronic Control Unit (ECU) software to be updated without
replacing the ECU. The following steps describe how to properly flash reprogram an ECU using the
Techstream diagnostic application and Calibration Update Wizard (CUW).
replacing the ECU. The following steps describe how to properly flash reprogram an ECU using the
Techstream diagnostic application and Calibration Update Wizard (CUW).
What’s Calibration Update Wizard (CUW)?
Calibration Update Wizard is a software program developed by Toyota Diagnostics. A scheduled task is added to Windows Task Scheduler in order to launch the program at various scheduled times (the schedule varies depending on the version).
Models applied:
Toyota:
2001 – 2013
4Runner, Avalon,
Camry, Camry HV,
Celica, Corolla, Echo,
FJ Cruiser, Highlander,
Highlander HV, Land
Cruiser, MR2 Spyder,
Matrix, Prius, Prius
C, Prius PHV, Prius
V, RAV4, Sequoia,
Sienna, Solara,
Tacoma, Tundra,
Venza, Yaris
Camry, Camry HV,
Celica, Corolla, Echo,
FJ Cruiser, Highlander,
Highlander HV, Land
Cruiser, MR2 Spyder,
Matrix, Prius, Prius
C, Prius PHV, Prius
V, RAV4, Sequoia,
Sienna, Solara,
Tacoma, Tundra,
Venza, Yaris
Lexus:
2001 – 2018 Engine/Hybrid System
CT200H, ES300H, ES330,
ES350, GS F, GS200T,
GS300, GS350, GS430,
GS450H, GS460, GX460,
GX470, HS250H, IS F,
IS200T, IS250, IS250C,
IS300, IS350, IS350C,
LC500, LC500H, LFA,
LS430, LS460, LS500,
LS500H, LS600H, LX470,
LX570, NX200T, NX300,
NX300H, RC F, RC200T,
RC300, RC350, RX300,
RX330, RX350, RX400H,
RX450H, SC430
ES350, GS F, GS200T,
GS300, GS350, GS430,
GS450H, GS460, GX460,
GX470, HS250H, IS F,
IS200T, IS250, IS250C,
IS300, IS350, IS350C,
LC500, LC500H, LFA,
LS430, LS460, LS500,
LS500H, LS600H, LX470,
LX570, NX200T, NX300,
NX300H, RC F, RC200T,
RC300, RC350, RX300,
RX330, RX350, RX400H,
RX450H, SC430
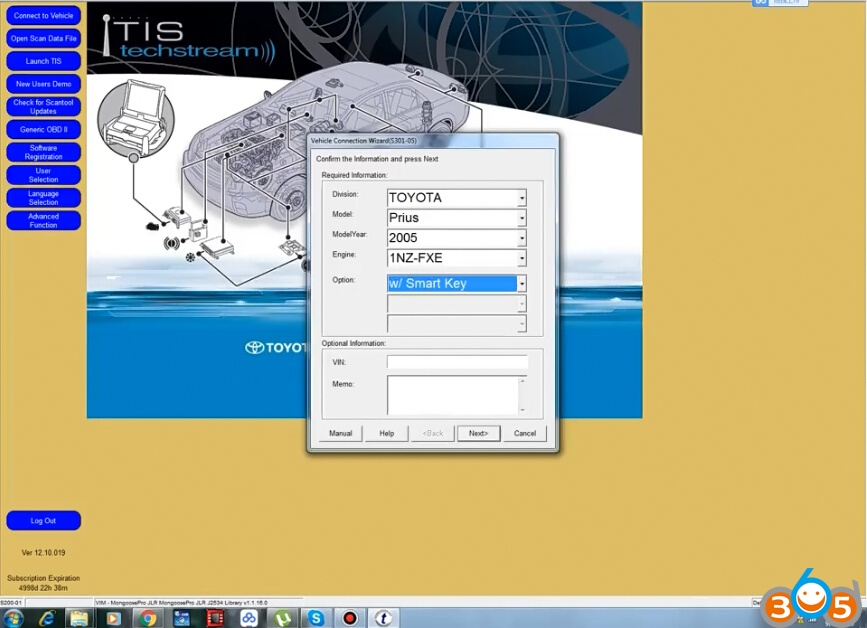
Example: Toyota Prius 2005
Toyota Techstream ECU flash reprogramming is a 4–step process:
1. Verify the vehicle’s applicability for recalibration and locate desired calibration file.
Vehicle applicability can be determined by the following methods:
1. Verify the vehicle’s applicability for recalibration and locate desired calibration file.
Vehicle applicability can be determined by the following methods:
Techstream ECU Reprogram Function
Techstream Health Check Function
2. Connect the GR8 battery charger.
The GR8 battery charger includes a Power Supply Mode that maintains battery voltage at 13.5 volts during ECU reprogramming.
3. Locate appropriate calibration ID and reprogram the vehicle ECU with Techstream. Techstream uses the Calibration Update Wizard (CUW) application to open calibration files and facilitate the ECU flash reprogramming process.
4. Affix the Authorized Vehicle Modification Label.
Modifications to ECU calibrations MUST be recorded and properly displayed on the vehicle using the Authorized Modification Label
Toyota Techstream ECU Flash Reprogramming Procedure:
Techstream Preparation – Selecting the Correct VIM
Techstream software requires a VIM selection before it can be used for reprogramming.
Perform the following:
1. Select Setup from the Techstream Main Menu screen.
Perform the following:
1. Select Setup from the Techstream Main Menu screen.
2. Select VIM Select from the Setup drop-down menu.
3. Select the correct interface setup from the drop-down list.
4.Enter vehicle information
Step 1. Verify the vehicle’s applicability for recalibration and locate desired calibration file.
A. ECU Reprogram Method:
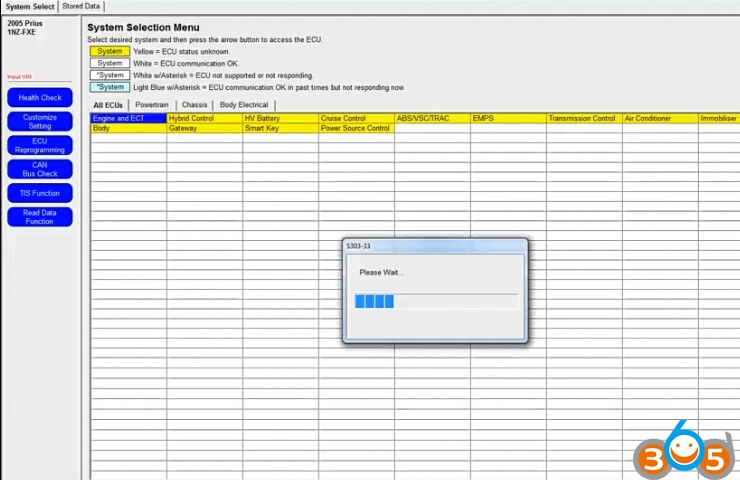
a. Establish a vehicle connection.
b. Click the ECU Reprogramming button on the System Select tab
A. ECU Reprogram Method:
a. Establish a vehicle connection.
b. Click the ECU Reprogramming button on the System Select tab

c. Select available ECU(s) from the Calibration Update Check List

d. Click the green arrow button (bottom right of screen) to retrieve current calibration ID(s) and check for available calibration updates.
e. Available calibration updates are indicated by a Yes in the Calibration Update column . Click the Yes link to access the appropriate service bulletin on TIS.

f. Log in to TIS. (If already logged in, skip this step.)
g. To access the calibration file, click the service bulletin link in the Document
Title column of the Calibration Search Result portlet
g. To access the calibration file, click the service bulletin link in the Document
Title column of the Calibration Search Result portlet

B. Health Check Method.
a. Establish a vehicle connection.
b. Click the Health Check button on the System Select tab
a. Establish a vehicle connection.
b. Click the Health Check button on the System Select tab
c. Choose desired ECU group(s) in the Health Check dialog box.
e. Click Continue to view Health Check results
d. Click Next.
f. Available calibration updates are indicated by a Yes link in the Cal Update?
column. Click the Yes link to access the appropriate service bulletin on TIS
column. Click the Yes link to access the appropriate service bulletin on TIS
g. Log in to TIS. (If already logged in, skip this step
h. To review the TSIB and access the calibration file, click the service bulletin link
in the Document Title column of the Calibration Search Result portlet.
in the Document Title column of the Calibration Search Result portlet.
NOTE:
Only Lexus Senior, Master, and DS Technicians may access calibration files
Only Lexus Senior, Master, and DS Technicians may access calibration files
Step 2: Connect the GR8 Battery Diagnostic Station.
A. Connect the GR8 Battery Diagnostic Station to the vehicle and turn it ON.
B. Select Power Supply Mode by following the screen flow below
B. Select Power Supply Mode by following the screen flow below

Click the appropriate calibration ID and reprogram the vehicle’s ECU with Techstream.
A. After reviewing the procedures outlined in the selected Service Bulletin, click the appropriate
calibration ID link by matching the vehicle’s current calibration ID to the Previous Calibration
ID in the Calibration Identification Chart.
A. After reviewing the procedures outlined in the selected Service Bulletin, click the appropriate
calibration ID link by matching the vehicle’s current calibration ID to the Previous Calibration
ID in the Calibration Identification Chart.
• Calibration files are embedded as live links in the Service Bulletin.
• Some vehicles require special preparation — please review the selected Service
Bulletin carefully.
• Some vehicles require special preparation — please review the selected Service
Bulletin carefully.

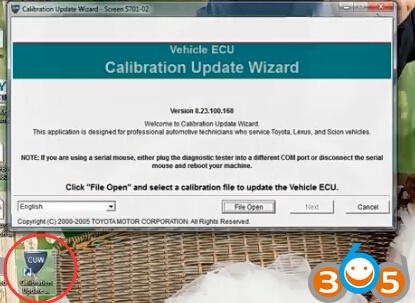
Step 3: Reprogram ECU with Techstream
Open Calibration Update Wizard
Select desired programming device, here we choose Generic J2534 interface
Confirm the following:
• PC is connected to VIM.
• VIM is connected to DLC3 connector.
• Ignition is ON and engine is OFF or “READY” OFF (hybrid vehicles)
• PC is connected to VIM.
• VIM is connected to DLC3 connector.
• Ignition is ON and engine is OFF or “READY” OFF (hybrid vehicles)

Press File Open button to open calibration file

Connect J2534 interface with vehicle
Select correct J2534 device tool
Select correct J2534 device tool
Downloading current calibration information from vehicle
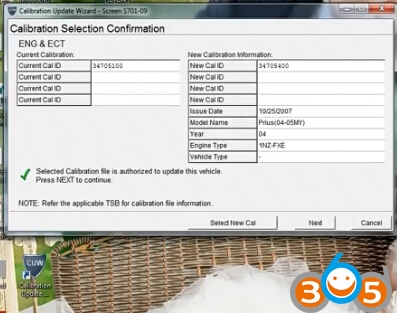
Verify correct current calibration and new calibration information
• The total number of calibration IDs in the calibration file corresponds to the number of
reprogrammable processors in the ECU.
• Each calibration file may contain up to three separate calibrations.
reprogrammable processors in the ECU.
• Each calibration file may contain up to three separate calibrations.
• Figure above shows an example of the update procedure for a one-processor ECU.
Press Next

Turn ignition OFF
Press Next
Wait for 10 seconds

Confirm the following conditions:
1. Turn ignition ON
2. Engine hood open
3. All eletrical accessories are OFF
4. Battery voltage above 11.8V
Verify the vehicle is connected to a battery charger before continuing — If battery voltage falls below 11.4 volts, ECU damage may occur
Click Start button to begin reprogramming

• ECU flash reprogramming may take anywhere from 3 – 30 minutes per calibration file.
• Reprogramming time will vary depending on model and ECU communication protocol.
Vehicles using CAN communication protocol will reprogram much faster (2 – 7
minutes).
• Reprogramming time will vary depending on model and ECU communication protocol.
Vehicles using CAN communication protocol will reprogram much faster (2 – 7
minutes).
Flash calibration CAL1 update in process
• If vehicle requires only ONE calibration update, then proceed to step N in this bulletin.
• If vehicle requires a SECOND calibration update, then continue as follows:
• For serial communication vehicles, go to step J.
• For CAN communication vehicles, go to step L.
• If vehicle requires a SECOND calibration update, then continue as follows:
• For serial communication vehicles, go to step J.
• For CAN communication vehicles, go to step L.
(* Do NOT disturb the vehicle during flash reprogramming.
If key cycle is NOT done properly, reprogramming will stop at 10% and Cal 1 will fail to load.)

CAL 1 has been loaded successfully
Turn ignition OFF
Press Next
Turn ignition OFF
Press Next
When Cal 1 has completed the update process, turn ignition OFF for a minimum of
10 seconds.
10 seconds.
Turn ignition ON
Downloading current calibration information from vehicle

Confirm that calibration ID has been updated
Confirm all calibrations were updated as specified in the Service Bulletin. Then click Finish.
NOTE
Some DTCs may have been set during the reprogramming process. Clear all DTCs with Techstream software
after restoring vehicle.
Some DTCs may have been set during the reprogramming process. Clear all DTCs with Techstream software
after restoring vehicle.


Step 4: Attach the Authorized Modifications Label.
A. Using a permanent marker or ball point pen, complete the Authorized Modifications Label
and attach to the vehicle. The Authorized Modifications Label is available through the MDC,
P/N 00451-00001-LBL.
A. Using a permanent marker or ball point pen, complete the Authorized Modifications Label
and attach to the vehicle. The Authorized Modifications Label is available through the MDC,
P/N 00451-00001-LBL.

Attach the label under the hood in the location determined by the specific Service Bulletin
or Campaign.
or Campaign.
NOTE
Wait 60 – 90 seconds for ink to set before handling.
Wait 60 – 90 seconds for ink to set before handling.
 RSS Feed
